我的痛点
最近在折腾blockly4pi(暂未开源),这是一个很好玩的项目,试图用blockly来控制树莓派,将硬件功能积木化,从而降低硬件编程入门门槛
在这个项目中,我将blockly用作代码生成器,这和官方的定位相同,虽然你也可以以其他方式使用它,但我认为将其用作代码生成器,并保持积木的灵活与可组合性(do one thing and do well),能发挥极大的威力
我把对blockly的理解都写在这里了:blockly入门与介绍
在这个项目中,我遇到一个很典型的问题:将浏览器里的代码丢到机器上运行,然后拿到运行结果,最好能即使给出运行过程信息
大概像这样
![架构图]()
实际上这是大多web IDE在做的事
我的第一个版本很粗暴,用户拼接好积木,blockly生成代码后,点击运行,代码(python)被post到树莓派,在那里执行,然后返回运行结果
这个过程粗暴到无从批评,因为到处都是槽点,灵活性和扩展性都很糟糕。
第二个版本采用了websocket(flask-socketio)来通信,后台也加入了事件机制,这样一来阻塞的问题得到解决,c/s两边能及时传递运行时信息
后来意识到我填坑流的泪,都是当初选web框架时脑子进的水,我需要一个异步非阻塞的框架 ,而不是对flask修修补补,一会加上多线程,一会儿加上事件机制,如果最初就选择tornado省去多少时间
踏破铁鞋
再往后我发现,我特么就是在重造一个轮子,这个轮子在jupyter notebook已经实现得非常漂亮了
jupyter notebook之前叫ipython notebook,我是它的脑残粉,之前对其做过介绍:
jupyter notebook的架构
在jupyter主页上,官方有对其做个简要说明:
The Jupyter Notebook is based on a set of open standards for interactive computing. Think HTML and CSS for interactive computing on the web. These open standards can be leveraged by third party developers to build customized applications with embedded interactive computing.
jupyter notebook基于若干开放标准,可以将其视为三个部分:
- Notebook Document Format : 基于JSON的开放文档格式,完整地记录用户的会话(sessions)和代码、说明性的文本、方程以及富文本输出
- Interactive Computing Protocol: 该协议用于连接Notebook和内核,基于JSON数据、ZMQ以及WebSockets
- The Kernel: 使用特定编程语言实际跑代码的地方,并将输出返回给用户。内核也返回tab键补全信息
架构图
上边提到的三个部分直接的关系如下
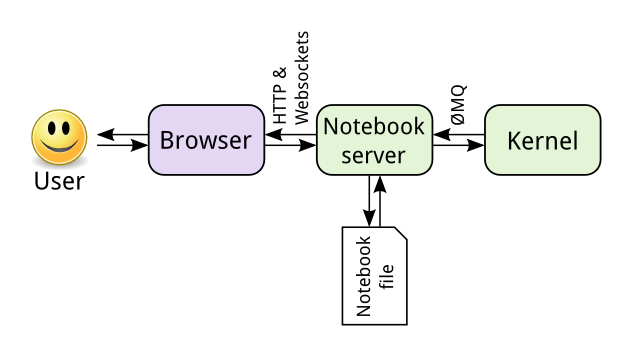
于是我们可以回答what happens when这类经典问题,当我们点击运行print("hello world")时发生了什么
从上图我们可以看出发生了这样一些事:用户在浏览器里写代码,点击运行后,代码从浏览器发送给Web服务器(tornado),接着从Web服务器发送消息到Kernel(python)执行代码,在Kernel中执行代码产生的输出/错误会被发送给Web服务器,接着发往给浏览器,用户于是看到输出,这个过程说起来很绕,实际执行飞快无比
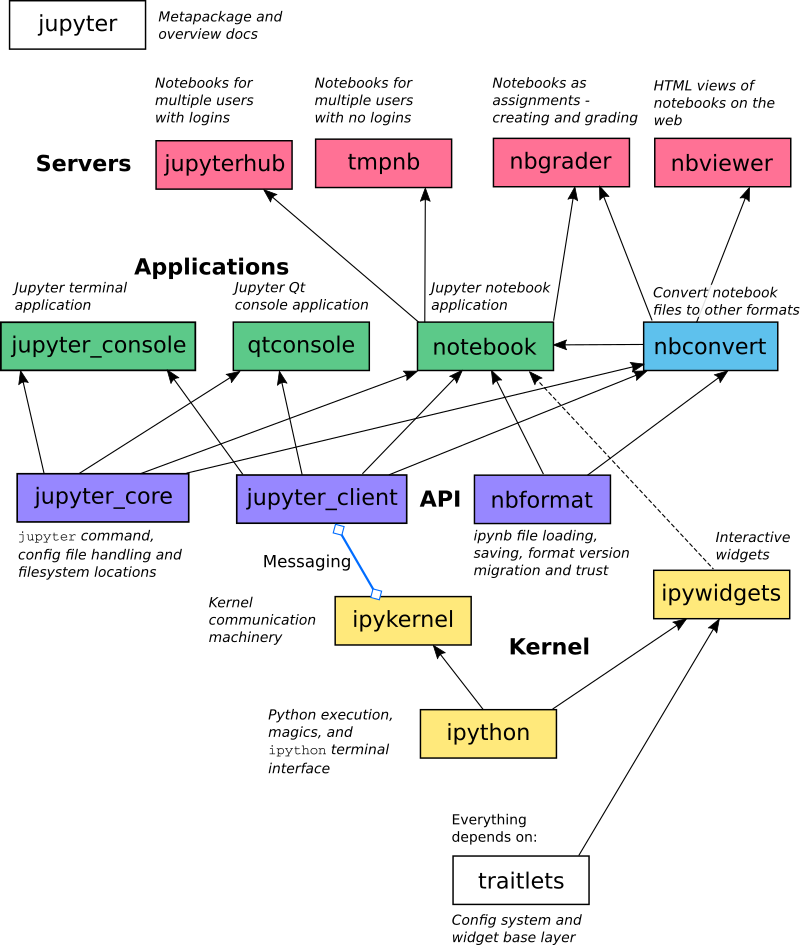
如果你对jupyter的生态有兴趣,那么下边这张架构图,能让你看出各个项目直接的关系,如果你只关心jupyter notebook,它也给出了更为细致的信息
如果你对通信过程很感兴趣,这一看下这张图(消息的传输用到了 ZeroMQ):
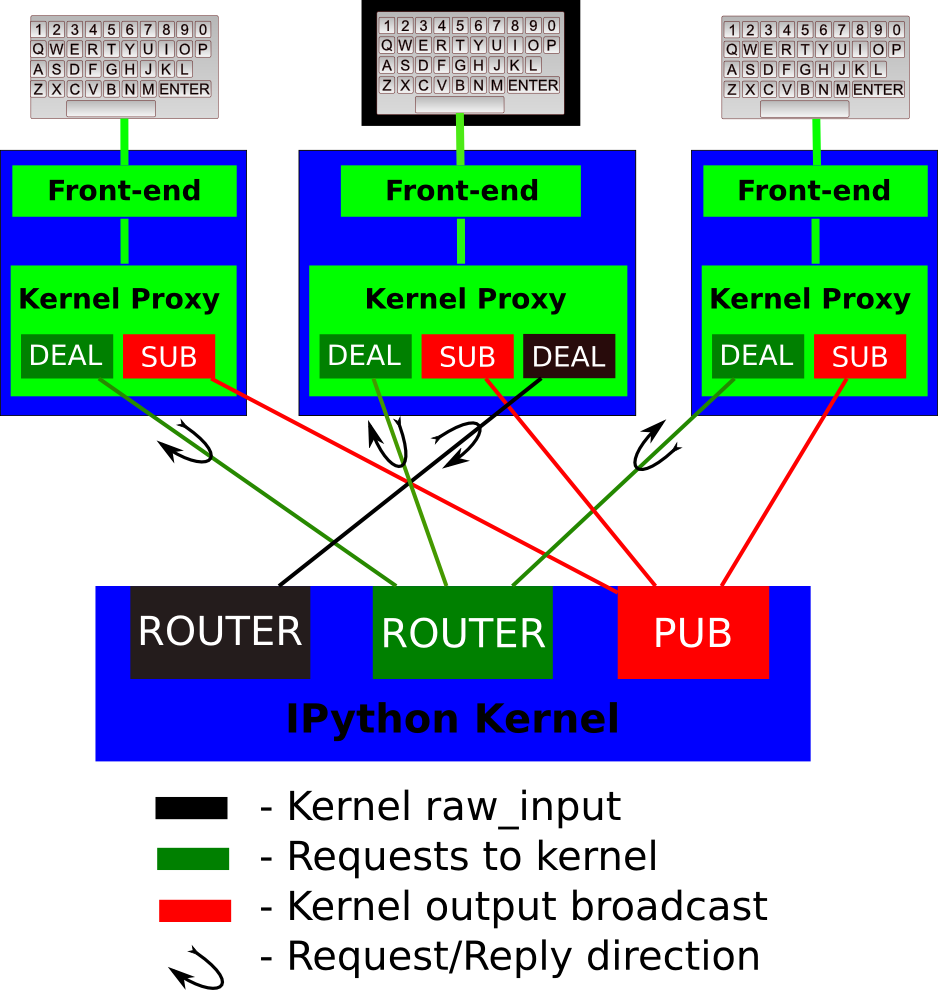
如果你对ZeroMQ有兴趣,可以看我之前的笔记消息队列中间件学习笔记
从途中我们可以看到主要利用了ZeroMQ的Publisher-Subscriber模式来做通信
回到我的项目上
对上边what happens when的回答稍作修改,我们就能得到一个改良版的blocklu4pi的架构,而且这类架构几乎适用于任何的web IDE类型的项目。blockly正在流行,这套架构之后大有用武之地
修改后的通信流程为: 用户在浏览器里拖拽blockly积木块生成代码,点击运行后,代码从浏览器发送给Web服务器(tornado),接着从Web服务器发送消息到Kernel(python)执行代码,在Kernel中执行代码产生的输出/错误会被发送给Web服务器,接着发往给浏览器,用户于是看到输出
上述两个流程的区别仅在于产生代码的方式不同而已,jupyter是用户手写,而blockly是用积木生成,余下过程一!模!一!样!
交互式探索
为了对通信和调用过程有更细致的了解,我们可以在notebook里进行交互式探索, REPL优雅之处在于让我们方便地做实验与探索未知
这篇文章给了我们一个思路来观察Kernel是如何接收、运行和返回消息:
用户代码和Kernel在同一进程中执行,因此我们可以通过一些特殊的代码研究Kernel是如何接收、运行并返回消息的
作者接下来演示了如何通过
gc, threading, traceback, inspect查看了Kernel是如何接收和发送消息,以及如何运行用户代码的
非常有意思的一篇分析,不过因为时间过去较久,架构有些调整,所以我这边给出最新的交互数据
我的版本为
1
2
3
|
jupyter 4.3.0
ipython 5.2.2
notebook 4.4.1
|
下边是实验数据
Kernel中的Socket对象
通过gc模块的get_objects()遍历进程中所有的对象
1
2
3
4
5
|
import gc
def get_objects(class_name):
    return [o for o in gc.get_objects() if type(o).__name__ == class_name]
kapp = get_objects("IPKernelApp")[0] #<ipykernel.kernelapp.IPKernelApp at 0x108a22d10>
kapp.shell_socket, kapp.iopub_socket # (<zmq.sugar.socket.Socket at 0x108a8d328>, <ipykernel.iostream.BackgroundSocket at 0x108aa3850>)
|
IPKernelApp对象的shell_socket和iopub_socket分别用于接收命令和广播代码执行输出,对应于架构图部分表示通信过程的图中绿色和红色端口
在Notebook中执行用户输入的print时,会经由iopub_socket将输出的内容传送给Web服务器,最终在Notebook界面中显示
我们知道python中,print语句实际上会调用sys.stdout完成输出工作
那么Kernel中的sys.stdout是什么对象
1
2
3
|
import sys
print sys.stdout #<ipykernel.iostream.OutStream object at 0x108a9cfd0>
print sys.stdout.pub_thread # <ipykernel.iostream.IOPubThread at 0x108aa32d0>
|
前头说到iopub_socket用于广播代码的输出,可以推测sys.stdout是一个对kapp.iopub_socket进行包装的OutStream对象(sys.stdout经由kapp.iopub_socket广播出来)
我们可以发现sys.stderr和sys.stdout是同个对象(内存地址完全相同)
Kernel中的线程
通过threading.enumerate()可以获得当前进程中的所有线程
1
2
3
4
5
6
7
8
9
|
import threading
threading.enumerate()
'''
[<_MainThread(MainThread, started 140736413283264)>,
 <Thread(Thread-2, started daemon 123145475149824)>,
 <HistorySavingThread(IPythonHistorySavingThread, started 123145485709312)>,
 <Heartbeat(Thread-3, started daemon 123145479356416)>,
 <ParentPollerUnix(Thread-1, started daemon 123145489915904)>]
'''
|
各个线程的功能为:
- 主线程(MainThread)接收来自前端的命令,执行用户代码,并输出代码的执行结果。
- HistorySaving线程用户将用户输入的历史保存到Sqlite数据库中
- Heartbeat线程用于定时向前端发送消息,用于检测心跳
- ParentPollerUnix线程,监视父进程,如果父进程退出,则保证Kernel进程也退出
用户代码的执行
通过在用户代码中执行traceback.print_stack()输出整个执行堆栈
 1
 2
 3
 4
 5
 6
 7
 8
 9
10
11
12
13
14
15
16
17
18
19
20
21
22
23
24
25
26
27
28
29
30
31
32
33
34
35
36
37
38
39
40
41
42
|
File "/System/Library/Frameworks/Python.framework/Versions/2.7/lib/python2.7/runpy.py", line 162, in _run_module_as_main
    "__main__", fname, loader, pkg_name)
  File "/System/Library/Frameworks/Python.framework/Versions/2.7/lib/python2.7/runpy.py", line 72, in _run_code
    exec code in run_globals
  File "/Users/wwj/env/lib/python2.7/site-packages/ipykernel/__main__.py", line 3, in <module>
    app.launch_new_instance()
  File "/Users/wwj/env/lib/python2.7/site-packages/traitlets/config/application.py", line 658, in launch_instance
    app.start()
  File "/Users/wwj/env/lib/python2.7/site-packages/ipykernel/kernelapp.py", line 474, in start
    ioloop.IOLoop.instance().start()
  File "/Users/wwj/env/lib/python2.7/site-packages/zmq/eventloop/ioloop.py", line 177, in start
    super(ZMQIOLoop, self).start()
  File "/Users/wwj/env/lib/python2.7/site-packages/tornado/ioloop.py", line 887, in start
    handler_func(fd_obj, events)
  File "/Users/wwj/env/lib/python2.7/site-packages/tornado/stack_context.py", line 275, in null_wrapper
    return fn(*args, **kwargs)
  File "/Users/wwj/env/lib/python2.7/site-packages/zmq/eventloop/zmqstream.py", line 440, in _handle_events
    self._handle_recv()
  File "/Users/wwj/env/lib/python2.7/site-packages/zmq/eventloop/zmqstream.py", line 472, in _handle_recv
    self._run_callback(callback, msg)
  File "/Users/wwj/env/lib/python2.7/site-packages/zmq/eventloop/zmqstream.py", line 414, in _run_callback
    callback(*args, **kwargs)
  File "/Users/wwj/env/lib/python2.7/site-packages/tornado/stack_context.py", line 275, in null_wrapper
    return fn(*args, **kwargs)
  File "/Users/wwj/env/lib/python2.7/site-packages/ipykernel/kernelbase.py", line 276, in dispatcher
    return self.dispatch_shell(stream, msg)
  File "/Users/wwj/env/lib/python2.7/site-packages/ipykernel/kernelbase.py", line 228, in dispatch_shell
    handler(stream, idents, msg)
  File "/Users/wwj/env/lib/python2.7/site-packages/ipykernel/kernelbase.py", line 390, in execute_request
    user_expressions, allow_stdin)
  File "/Users/wwj/env/lib/python2.7/site-packages/ipykernel/ipkernel.py", line 196, in do_execute
    res = shell.run_cell(code, store_history=store_history, silent=silent)
  File "/Users/wwj/env/lib/python2.7/site-packages/ipykernel/zmqshell.py", line 501, in run_cell
    return super(ZMQInteractiveShell, self).run_cell(*args, **kwargs)
  File "/Users/wwj/env/lib/python2.7/site-packages/IPython/core/interactiveshell.py", line 2717, in run_cell
    interactivity=interactivity, compiler=compiler, result=result)
  File "/Users/wwj/env/lib/python2.7/site-packages/IPython/core/interactiveshell.py", line 2827, in run_ast_nodes
    if self.run_code(code, result):
  File "/Users/wwj/env/lib/python2.7/site-packages/IPython/core/interactiveshell.py", line 2881, in run_code
    exec(code_obj, self.user_global_ns, self.user_ns)
  File "<ipython-input-2-2e94e8c65f66>", line 2, in <module>
    traceback.print_stack()
|
从中可以看到用户代码是如何被调用的
在KernelApp对象的start()中,调用ZeroMQ中的ioloop.start()处理来自shell_socket的消息。当从Web服务器接收到execute_request消息时,将调用kernel.execute_request()方法
kapp.kernel.execute_request #<bound method IPythonKernel.execute_request of <ipykernel.ipkernel.IPythonKernel object at 0x10c09f910>>
在execute_request()中调用shell对象的如下方法最终执行用户代码:
1
2
3
|
print kapp.kernel.shell.run_cell #<bound method ZMQInteractiveShell.run_cell of <ipykernel.zmqshell.ZMQInteractiveShell object at 0x10c09f950>>
print kapp.kernel.shell.run_ast_nodes #<bound method ZMQInteractiveShell.run_ast_nodes of <ipykernel.zmqshell.ZMQInteractiveShell object at 0x10c09f950>>
print kapp.kernel.shell.run_code #<bound method ZMQInteractiveShell.run_code of <ipykernel.zmqshell.ZMQInteractiveShell object at 0x10c09f950>>
|
shell对象在其user_global_ns和user_ns属性在执行代码,这两个字典就是用户代码的执行环境,实际上它们是同一个字典
1
2
|
print globals() is kapp.kernel.shell.user_global_ns #True
print globals() is kapp.kernel.shell.user_ns #True
|
查看shell_socket的消息
可以利用inspect.stack()获得前面的执行堆栈中的各个frame对象,从而查看堆栈中的局域变量的内容,这样可以观察到Kernel经由shell_socket接收的回送的消息
1
2
3
4
5
6
7
8
|
import inspect
frames = {}
for info in inspect.stack():
    if info[3] == "dispatch_shell":
        frames["request"] = info[0]
    if info[3] == "execute_request":
        frames["reply"] = info[0]
print "hello world"
|
以上代码在kernel里执行的时候,通信过程已经完成,所以我们可以拿到frames[“request”],frames[“reply”]在print "hello world"之前执行,所以frames[“reply”]不包含代码运行的结果
Kernel接收到的消息
 1
 2
 3
 4
 5
 6
 7
 8
 9
10
11
12
13
14
15
16
17
18
19
20
|
frames["request"].f_locals["msg"]
'''
{'buffers': [],
 'content': {'allow_stdin': True,
  'code': 'import inspect\nframes = {}\nfor info in inspect.stack():\n    if info[3] == "dispatch_shell":\n        frames["request"] = info[0]\n    if info[3] == "execute_request":\n        frames["reply"] = info[0]\nprint "hello world"',
  'silent': False,
  'stop_on_error': True,
  'store_history': True,
  'user_expressions': {}},
 'header': {'date': datetime.datetime(2017, 3, 8, 9, 35, 4, 596768, tzinfo=tzutc()),
  'msg_id': '0616032D8FE8469780CA0A4A89D578AD',
  'msg_type': 'execute_request',
  'session': '6DDDE94601B247779637A3F3A0F2F573',
  'username': 'username',
  'version': '5.0'},
 'metadata': {},
 'msg_id': '0616032D8FE8469780CA0A4A89D578AD',
 'msg_type': 'execute_request',
 'parent_header': {}}
'''
|
Kernel对上述消息的应答
 1
 2
 3
 4
 5
 6
 7
 8
 9
10
11
12
13
14
15
16
17
18
19
20
21
22
23
24
25
26
|
frames["reply"].f_locals["reply_msg"]
'''
{'content': {u'execution_count': 4,
  u'payload': [],
  u'status': u'ok',
  u'user_expressions': {}},
 'header': {'date': datetime.datetime(2017, 3, 8, 9, 35, 4, 613218, tzinfo=tzutc()),
  'msg_id': u'd4d00f59-d6a3739d12069c2fb8c0a23f',
  'msg_type': u'execute_reply',
  'session': u'337fb80f-b3760e2423717a4de6ff4ba8',
  'username': u'wwj',
  'version': '5.0'},
 'metadata': {'dependencies_met': True,
  'engine': u'7b3fd05a-613d-4c6e-a789-f952660d4edf',
  'started': datetime.datetime(2017, 3, 8, 17, 35, 4, 598015),
  'status': u'ok'},
 'msg_id': u'd4d00f59-d6a3739d12069c2fb8c0a23f',
 'msg_type': u'execute_reply',
 'parent_header': {'date': datetime.datetime(2017, 3, 8, 9, 35, 4, 596768, tzinfo=tzutc()),
  'msg_id': '0616032D8FE8469780CA0A4A89D578AD',
  'msg_type': 'execute_request',
  'session': '6DDDE94601B247779637A3F3A0F2F573',
  'username': 'username',
  'version': '5.0'},
 'tracker': <zmq.sugar.tracker.MessageTracker at 0x10b266f50>}
'''
|
上面的应答消息并非代码的执行结果,代码的输出在执行代码时已经经由sys.stdout->iopub_socket发送给Web服务器了。
手写一jupyter
jupyter已经演变得非常庞大,许多的代码都在打磨细节,如此一来直接阅读源码,会陷入各种细枝末节里,不大好一眼看到核心逻辑。为了理解原理,溯本求源是一个好方法,一种策略是翻到早起的版本或者commit
另一种策略是看一些类似的小项目(专注在原理实现),zmq-pykernel是一个不错的实验,它基于ZeroMQ来实现,非常小巧
写一个自己的kernel
尽管官方文档有相应教程,不过直接从metakernel开始是个不错的选择,metakernel为我们做了许多起步阶段的工作,具体可以参考metakernel features
参考