前言
记录我在开发 MicroBlocks 过程中积累的知识和技巧。
主要分为三个部分:
- MicroBlocks library(积木库)
- MicroBlocks VM(虚拟机)
- MicroBlocks IDE(图形化编程环境)
MicroBlocks library(积木库)
创建新的 library , 是将新设备引入 MicroBlocks 最简单也最常见的方法。
无需进入系统的"下一层", 一切工作都可以通过拼搭积木来完成。
MicroBlocks VM(虚拟机)
MicroBlocks wiki 对 MicroBlocks 虚拟机的解释:
MicroBlocks 代码由运行在微控制器板上的简单解释器或虚拟机(VM)执行。
如果我们需要为 MicroBlocks 引入新的原语(primitives), 就需要修改虚拟机相关的代码。如我们之前引入 MQTT 相关的原语。
MicroBlocks 虚拟机通过简单的串行协议与IDE或其他类型的软件(如Mozilla物联网网关)进行通信。
MicroBlocks 与其他编程语言的互操作 也是通过上述串行协议实现。
预编译固件
MicroBlocks IDE 里内置了官方维护的固件。通常情况你应该使用这些固件,它们经过了充分的测试。
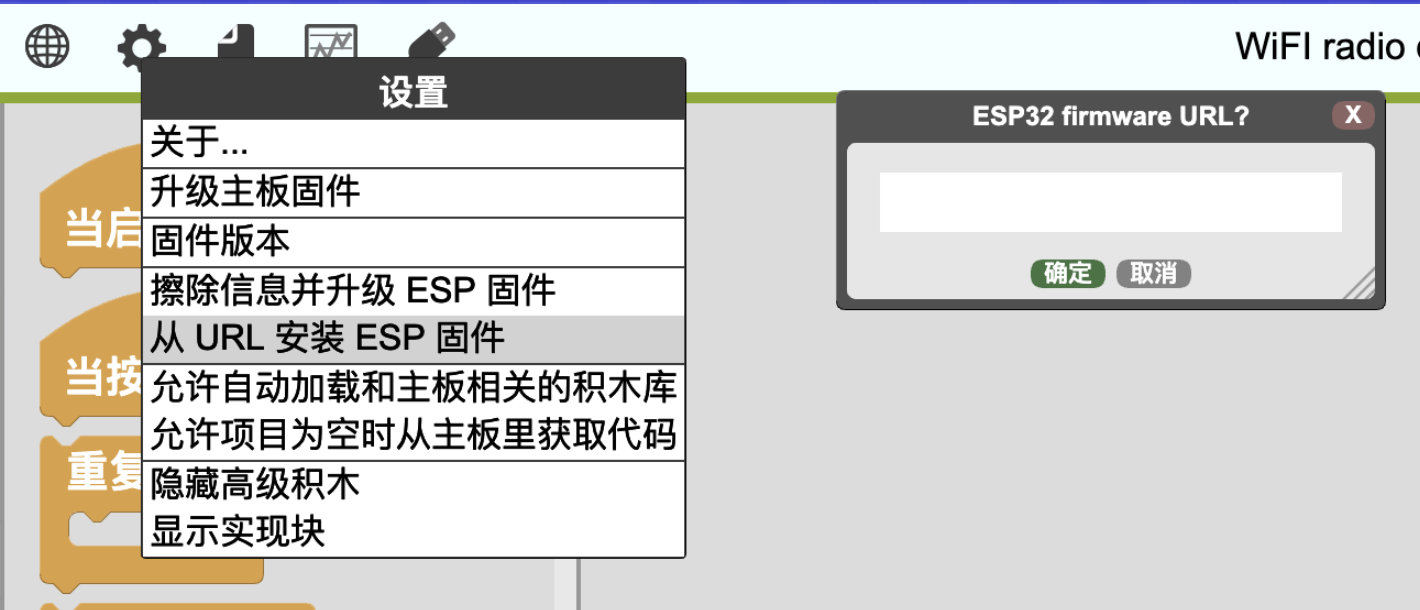
如果你想使用一些实验阶段的功能, 需要自行编译固件, 或者使用预编译的固件。以下是我预编译的固件:
- esp32-ble-keyboard: 模拟蓝牙键盘
- url 地址:
https://wwj718.github.io/post/img/esp32-ble-keyboard-20231118.bin
- 相关教程: MicroBlocks 编程案例: 制作无线 Makey Makey
- 提醒: 计算机会记住连接过的蓝牙键盘。如果你刷过这个固件, 以后刷其他固件,可能会无法连接 MicroBlocks IDE, 因为设备被计算机当成了蓝牙键盘. 你需要在计算机中"忘记"这个蓝牙键盘,在 iOS 上是忽略此设备
- esp32-espnow: 提供 espnow 相关原语
- url 地址:
https://wwj718.github.io/post/img/esp32-espnow-20231201.bin
- 示例项目
- esp32-bleclient
在线刷入固件:
你也可以自行编译固件
开发与调试
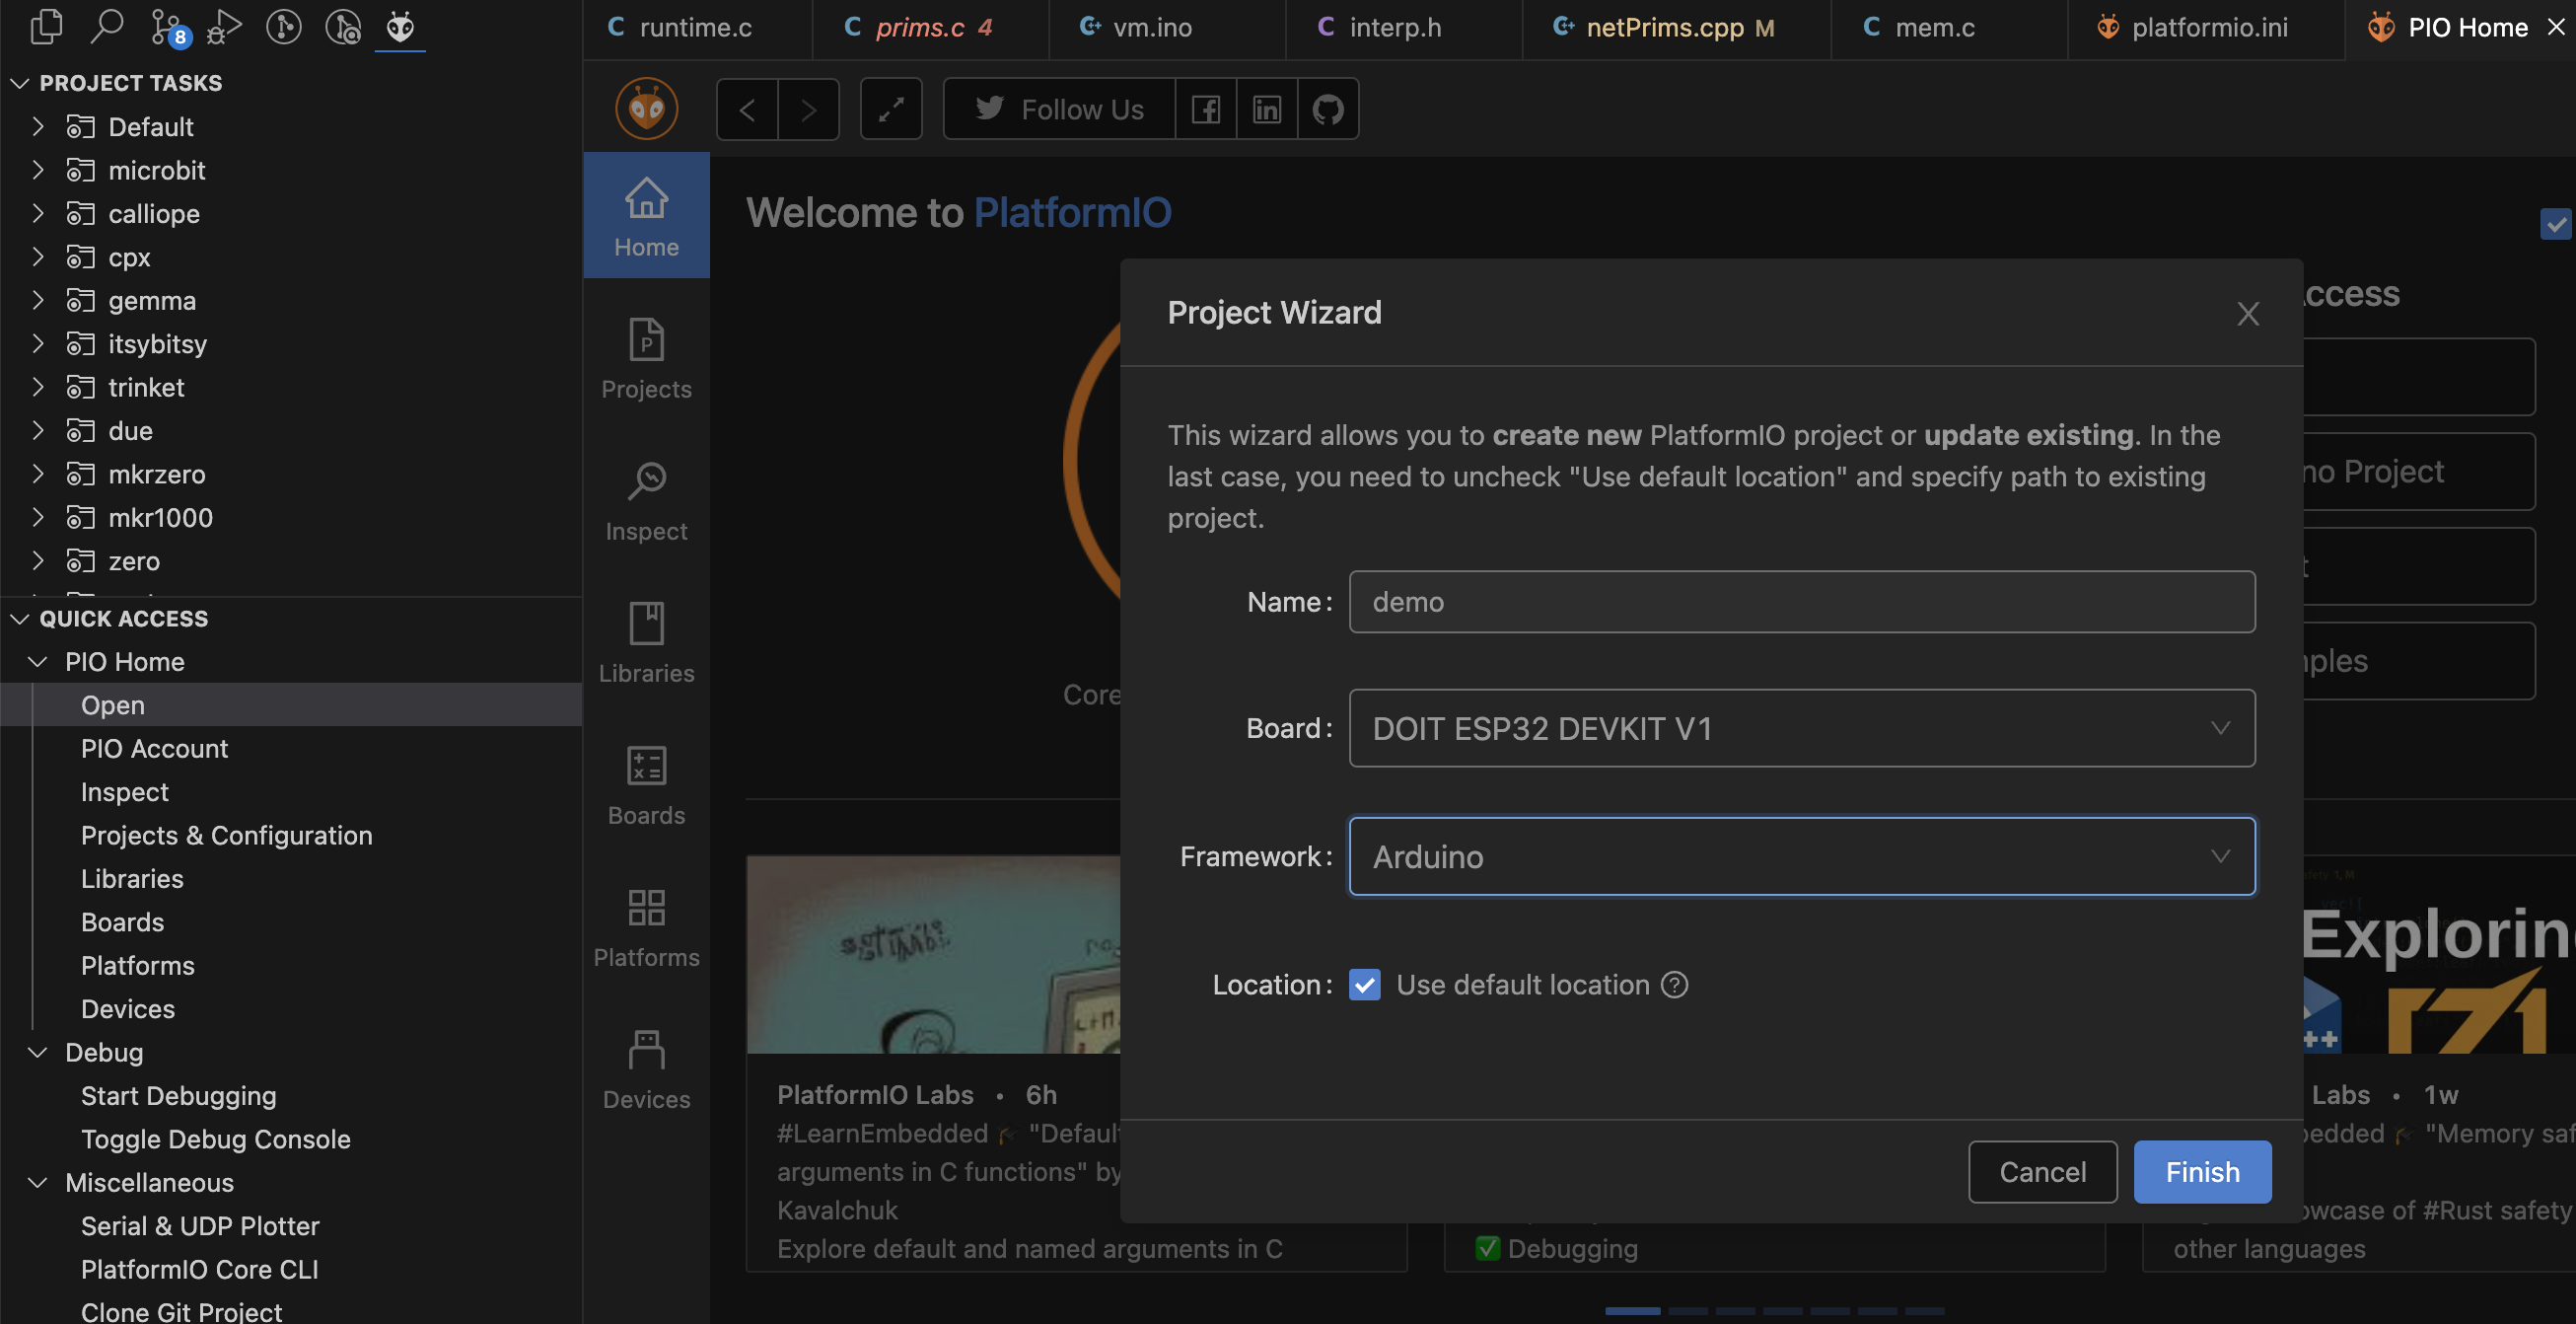
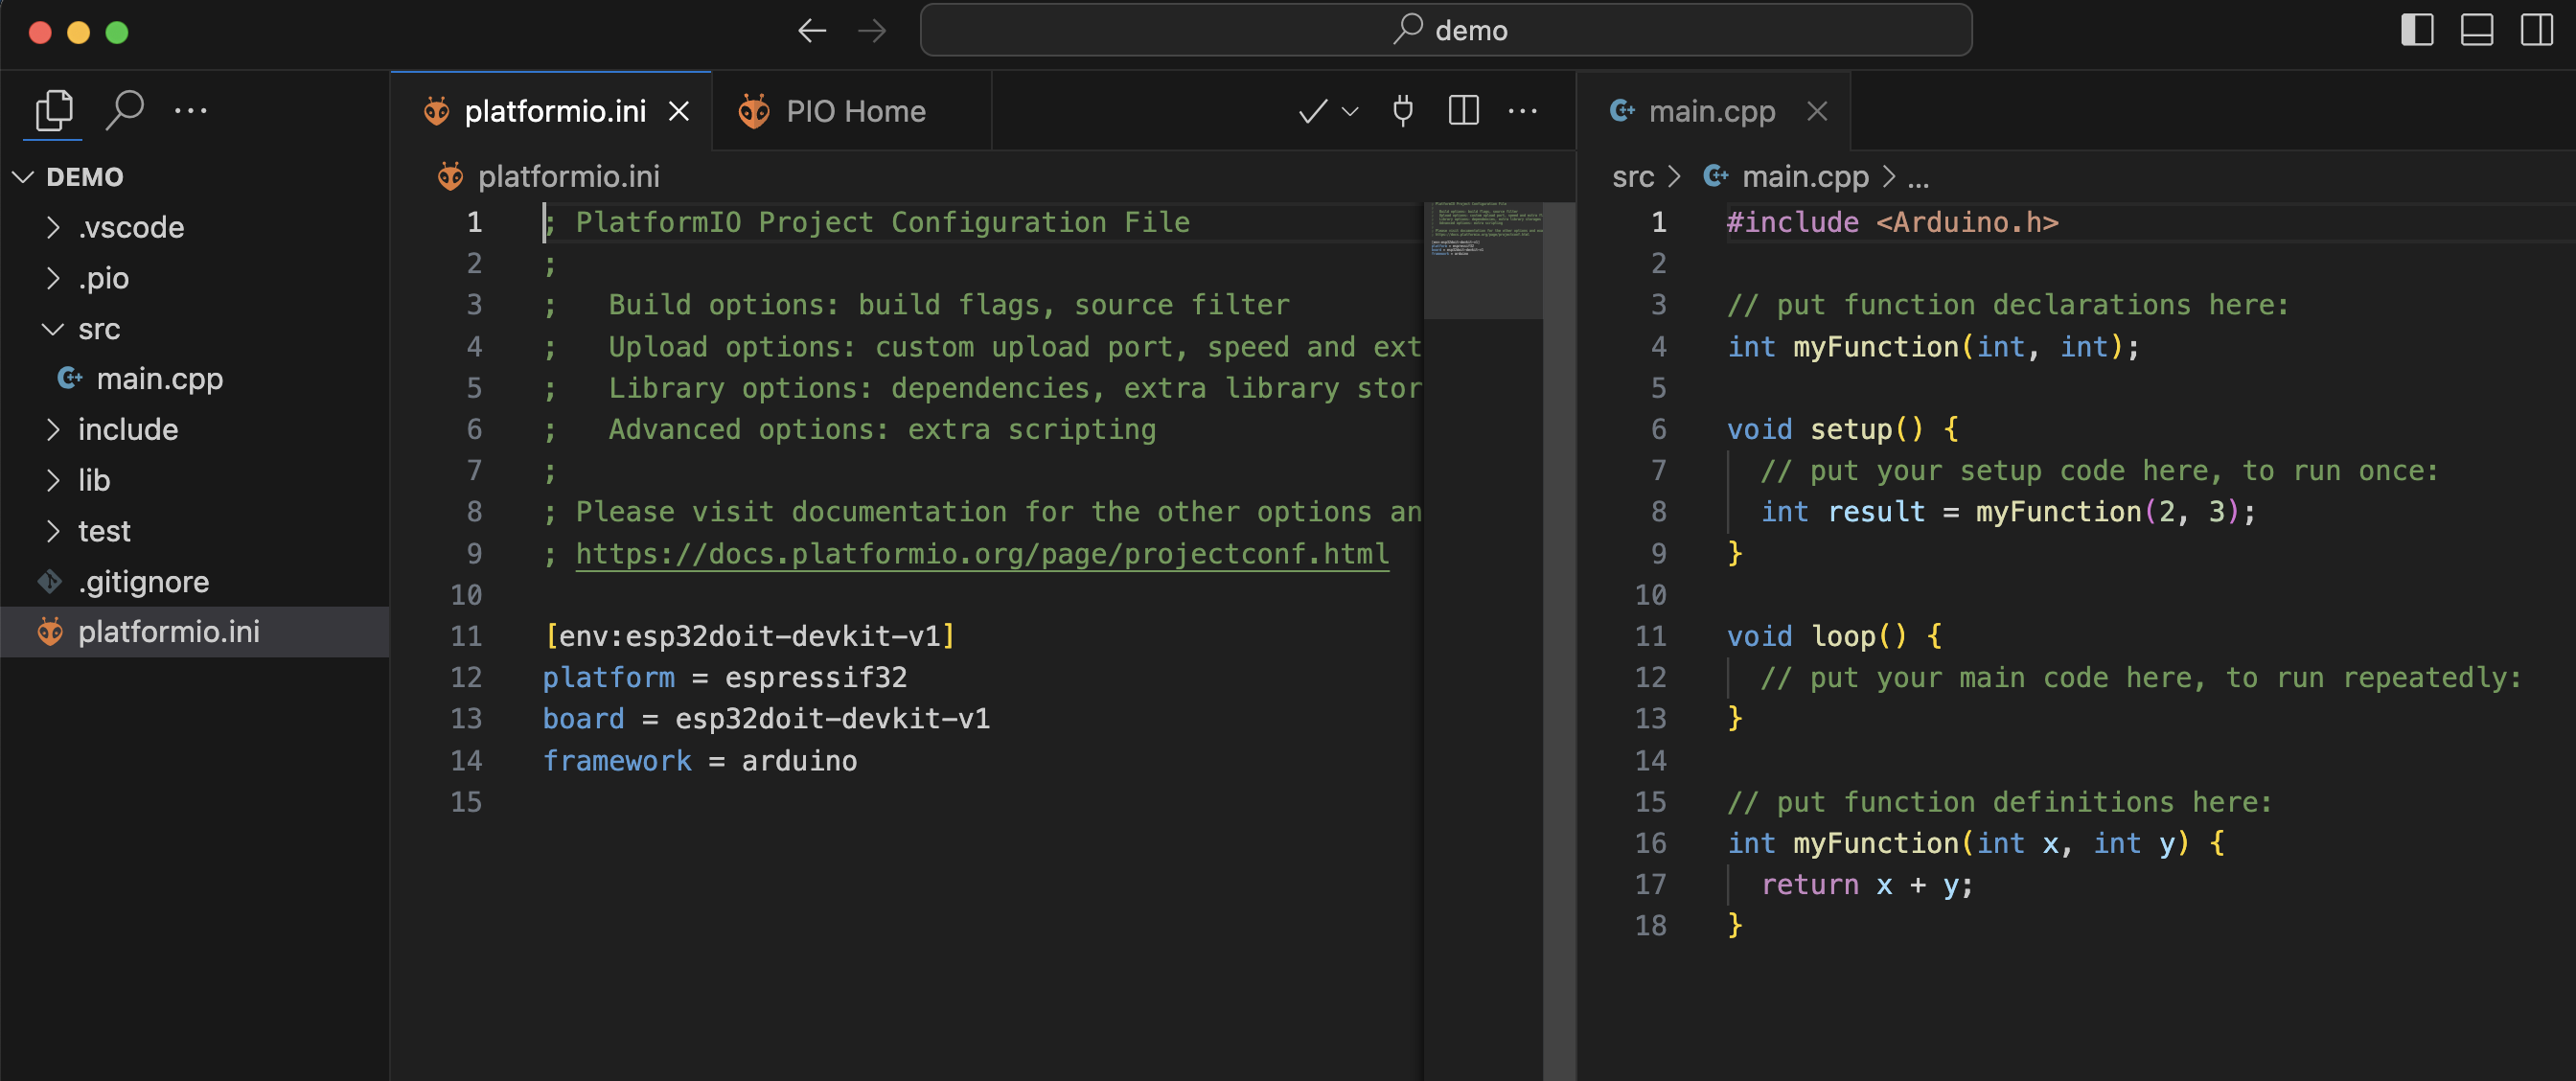
MicroBlocks VM 采用 C/C++ 编写。它基于 Arduino 平台, PlatformIO 是首选的构建工具。
platformio.ini 是项目的配置文件, 可以视为构建 VM 的起点。
以下是一些有用的 pio 命令。
- 编译 esp32 固件(
[env:esp32]): pio run -e esp32
- 编译并上传固件:
pio run -e esp32 -t upload
- 列出支持的板子名称:
- pio boards ESP32S3
- pio boards ESP32
- 更新工具链:
pio pkg update -g -p espressif32 (编译esp32-s3时用到)
以上操作也可以在 vscode 里做(安装 PlatformIO 插件)
C/C++ 编程环境
MicroBlocks VM 采用 C/C++ 编写
当我们为 MicroBlocks VM 引入新功能时, 有时遇到一些棘手的 bug。 我们不知道引起 bug 的原因是新代码本身的问题,还是新代码与旧代码互相影响导致的, 又或者是 MicroBlocks 本身的问题…
我们有时渴望回退到一个安全的"环境", 它足够干净和简单, 用于单独测试新的代码。
新建一个 PlatformIO 项目可能是不错的选择。
快速行动
The challenge is not building it but understanding it – Bret Victor 《Seeing Spaces》
有动态语言(Python, JavaScript)经验的开发者, 切换到编译型语言时, 通常渴望 REPL(Read-Eval-Print-Loop)。 在 REPL 中我们可以获得快速的反馈循环。
快速的反馈循环 通常能够把我带到心流中。我喜欢各种能够增强快速的反馈循环的工作流。
最近我喜欢的一个工作流是:
- 与 ChatGPT 沟通讨论, 让它编写任务代码。
- 在replit中启动一个干净的 C/C++ 编程环境, 将这些代码输入其中, 获得输出或错误
- 将代码调整到我想要的样子(这个过程可能涉及与 ChatGPT 的多次交流)
- 将实验过程获得的见解和代码, 合并到真实项目里。

输出调试信息
类似于 Python 的 print, JavaScript 有 console.log, C/C++ 一般使用 printf 输出调试信息。 MicroBlocks VM 中使用 sprintf。
sprintf 类似于 printf 函数,但它不是将输出发送到标准输出,而是格式化字符串并将其存储在一个字符串缓冲区中。
以下是它的典型用法:
1
2
3
|
char s[100];
sprintf(s, "Changing server port from %d to %d", serverPort, port);
outputString(s);
|
printf 格式化字符串 的所有功能, 你都可以使用。
MicroBlocks 构建了一些辅助 debug 的函数
1
2
3
4
5
6
7
8
|
void reportNum(const char *msg, int n) {
	char s[100];
	sprintf(s, "%s: %d", msg, n);
	outputString(s);
}
void reportHex(const char *msg, int n)...
void reportObj(const char *msg, OBJ obj)...
void memDumpObj(OBJ obj)...
|
如果你使用浏览器 MicroBlocks连接板子,输出的信息可以在浏览器调试工具里查看。
断点调试
ESP32-S3 内置 JTAG 调试接口
数据类型
std::string 与 char* 之间的转化
MicroBlocks 内置的字符串使用 char* (如 obj2str(args[0])), Arduino 生态里的许多库的字符串使用 std::string (如 NimBLE 库)。
经常需要在两者之间转化。 MicroBlocks 偏好在内部使用 C 风格的字符串。
1
2
3
4
5
6
7
|
// std::string -> char*
std::string str = "Hello World";
const char* cstr = str.c_str();

// char* -> std::string
const char* cstr = "Hello World";
std::string str(cstr);
|
比较两个字符串是否相等
 1
 2
 3
 4
 5
 6
 7
 8
 9
10
11
12
13
14
15
16
17
18
19
20
21
22
23
24
25
|
// 比较 C 风格的字符串
const char* cstr1 = "Hello";
const char* cstr2 = "Hello";

// ref: dataPrims.c/matches
//  strcmp 比较两个 C 风格的字符串, 如果字符串相等,strcmp 将返回 0
//  strcmp 大小写敏感, strcasecmp 大小写不敏感
printf("Result: %d\n", strcmp(cstr1, cstr2) == 0); // 1 表示 true, 0 表示 false
// Result: 1

// 比较 std::string 对象
std::string str1 = "Hello";
std::string str2 = "Hello";
// 使用 == 比较 std::string 对象
printf("Result: %d\n", str1 == str2); // 1 表示 true, 0 表示 false
// Result: 1

// 检查 str 是否以 prefix 开始, str 比 prefix 短, 不会出错
// strncasecmp 大小写不敏感
const char* str = "Hello World";
const char* prefix = "Hello";
bool startsWith = (strncmp(str, prefix, strlen(prefix)) == 0);
printf("Result: %d\n", startsWith); // 1 表示 true, 0 表示 false
// Result: 1
|
OBJ
动态性
 1
 2
 3
 4
 5
 6
 7
 8
 9
10
|
// ref: primBLEPressKey

OBJ key = args[0];

// accept both characters and ASCII values
if (IS_TYPE(key, StringType)) {
    bleKeyboard.press(obj2str(key)[0]);
} else if (isInt(key)) {
    bleKeyboard.press(obj2int(key));
}
|
常用技巧
默认参数
1
2
|
// ref: primBLE_UART_Start
const char* name = (argCount > 0) ? obj2str(args[0]) : "NimBLE UART";
|
虚拟机状态
MicroBlocks 虚拟机是有状态的。
MicroBlocks IDE 的停止按钮不会重置虚拟机。停止按钮会重置 MicroBlocks IDE 的所有变量。
这和 Scratch/Snap 虚拟机的行为是一致的。停止按钮 不会重置 Scratch/Snap 虚拟机。你可以做以下实验: 将角色拖拽到任意位置,点击停止按钮, 角色不会被重置到舞台中心。
要重置虚拟机, 只能重启微控制器。
以下代码展示了在虚拟机中维护状态。
 1
 2
 3
 4
 5
 6
 7
 8
 9
10
|
// ref: initBLEKeyboard

char bleKeyboardInitialized = 0;

void initBLEKeyboard () {
	if (!bleKeyboardInitialized) {
		bleKeyboard.begin(); // name
		bleKeyboardInitialized = 1;
	}
}
|
动态创建 List
1
2
3
4
5
6
7
8
9
|
// primMakeList
OBJ primMakeList(int argCount, OBJ *args) {
	OBJ result = newObj(ListType, argCount + 1, falseObj);
	if (!result) return result; // allocation failed

	FIELD(result, 0) = int2obj(argCount);
	for (int i = 0; i < argCount; i++) FIELD(result, i + 1) = args[i];
	return result;
}
|
在 IDE 与 VM 之间传递数据
常用的数据类型有:
- Int
- String
- ByteArray
- List (接受不同类型的数据)
▶️ IDE -> VM(点击展开)
 1
 2
 3
 4
 5
 6
 7
 8
 9
10
11
12
13
14
15
16
17
18
19
20
21
22
23
24
25
|
// ref: primUDPSendPacket
static OBJ primUDPSendPacket(int argCount, OBJ *args) {
	if (NO_WIFI()) return fail(noWiFi);
	if (!isConnectedToWiFi()) return fail(wifiNotConnected);

	if (argCount < 3) return fail(notEnoughArguments);
	OBJ data = args[0];
	char* ipAddr = obj2str(args[1]);
	int port = evalInt(args[2]);
	if (port <= 0) return falseObj; // bad port number

	udp.beginPacket(ipAddr, port);
	if (isInt(data)) {
		udp.print(obj2int(data));
	} else if (isBoolean(data)) {
		udp.print((trueObj == data) ? "true" : "false");
	} else if (StringType == TYPE(data)) {
		char *s = obj2str(data);
		udp.write((uint8_t *) s, strlen(s));
	} else if (ByteArrayType == TYPE(data)) {
		udp.write((uint8_t *) &data[HEADER_WORDS], BYTES(data));
	}
	udp.endPacket();
	return falseObj;
}
|
 1
 2
 3
 4
 5
 6
 7
 8
 9
10
11
12
13
14
15
|
// primWebSocketSendToClient
static OBJ primWebSocketSendToClient(int argCount, OBJ *args) {
	if (argCount < 2) return fail(notEnoughArguments);
	if (NO_WIFI()) return fail(noWiFi);

	int clientID = obj2int(args[1]);
	if (StringType == objType(args[0])) {
		char *msg = obj2str(args[0]);
		websocketServer.sendTXT(clientID, msg, strlen(msg));
	} else if (ByteArrayType == objType(args[0])) {
		uint8_t *msg = (uint8_t *) &FIELD(args[0], 0);
		websocketServer.sendBIN(clientID, msg, BYTES(args[0]));
	}
	return falseObj;
}
|
▶️ VM -> IDE(点击展开)
 1
 2
 3
 4
 5
 6
 7
 8
 9
10
11
12
13
14
15
16
17
18
19
20
21
22
23
24
|
// ref: primUDPReceivePacket
static OBJ primUDPReceivePacket(int argCount, OBJ *args) {
	if (NO_WIFI()) return fail(noWiFi);
	if (!isConnectedToWiFi()) return fail(wifiNotConnected);

	int useBinary = ((argCount > 0) && (trueObj == args[0]));
	int byteCount = udp.parsePacket();
	if (!byteCount) return (OBJ) &noDataString;

	OBJ result = falseObj;
	if (useBinary) {
		result = newObj(ByteArrayType, (byteCount + 3) / 4, falseObj);
		if (IS_TYPE(result, ByteArrayType)) setByteCountAdjust(result, byteCount);
	} else {
		result = newString(byteCount);
	}
	if (falseObj == result) { // allocation failed
		udp.flush(); // discard packet
		result = (OBJ) &noDataString;
	} else {
		udp.read((char *) &FIELD(result, 0), byteCount);
	}
	return result;
}
|
 1
 2
 3
 4
 5
 6
 7
 8
 9
10
11
12
13
14
15
16
17
18
19
20
21
22
23
24
25
26
27
28
29
30
31
32
33
34
35
36
|
// primWebSocketLastEvent

static void webSocketEventCallback(uint8_t client_id, WStype_t type, uint8_t *payload, size_t length) {
	websocketEvtType = type;
	websocketClientId = client_id;
	websocketPayloadLength = length;
	if (websocketPayloadLength > WEBSOCKET_MAX_PAYLOAD) websocketPayloadLength = WEBSOCKET_MAX_PAYLOAD;
	memcpy(websocketPayload, payload, websocketPayloadLength);
}

static OBJ primWebSocketLastEvent(int argCount, OBJ *args) {
	if (NO_WIFI()) return fail(noWiFi);

	websocketServer.loop();
	if (websocketEvtType > -1) {
		tempGCRoot = newObj(ListType, 4, zeroObj); // use tempGCRoot in case of GC
		if (!tempGCRoot) return falseObj; // allocation failed
		FIELD(tempGCRoot, 0) = int2obj(3);
		FIELD(tempGCRoot, 1) = int2obj(websocketEvtType);
		FIELD(tempGCRoot, 2) = int2obj(websocketClientId);
		if (WStype_TEXT == websocketEvtType) {
			FIELD(tempGCRoot, 3) = newStringFromBytes(websocketPayload, websocketPayloadLength);
		} else {
			int wordCount = (websocketPayloadLength + 3) / 4;
			FIELD(tempGCRoot, 3) = newObj(ByteArrayType, wordCount, falseObj);
			OBJ payload = FIELD(tempGCRoot, 3);
			if (!payload) return fail(insufficientMemoryError);
			memcpy(&FIELD(payload, 0), websocketPayload, websocketPayloadLength);
			setByteCountAdjust(payload, websocketPayloadLength);
		}
		websocketEvtType = -1;
		return tempGCRoot;
	} else {
		return falseObj;
	}
}
|
FAQ
Arduino 语言使用哪个 C++ 标准?
Arduino 平台主要使用一种简化的 C++ 版本,它是标准 C++ 的一个子集。Arduino 的开发环境基于 Wiring 语言,这本身是基于 C/C++ 的 – ChatGPT
AVR 核心使用 GCC 7.3.0, 并默认配置为使用 gnu++11 标准 – Which C++ standard does the Arduino language support?
合并 esp32 固件
提醒: 只测试过 esp32-wroom-32 模组
使用 pio run -e esp32 编译出的固件(位置在.pio/build/esp32/firmware.bin), 无法使用 ESPWebTool, esptool 等工具烧录到板子, 因为它并不完整。
如果你想使用使用 MicroBlocks 之外的工具烧录它,需要先合并固件:
 1
 2
 3
 4
 5
 6
 7
 8
 9
10
11
12
13
14
15
16
17
|
# 安装 esptool.py
python -m pip install esptool
# 进入 smallvm 目录
cd smallvm
# 编译固件
pio run -e esp32
# 合并为单一固件

# esp32

esptool.py --chip ESP32 merge_bin -o merged-flash.bin --flash_mode dio --flash_size 4MB 0x1000 esp32/bootloader_dio_40m.bin 0x8000 esp32/partitionsMicroBlocks.bin 0xe000 esp32/boot_app0.bin 0x10000 .pio/build/esp32/firmware.bin

# esp32 S3

esptool.py --chip ESP32-S3 merge_bin -o merged-flash.bin --flash_mode dio --flash_size 4MB 0x0 esp32/bootloader_s3.bin 0x8000 esp32/partitionsMicroBlocks.bin 0xe000 esp32/boot_app0.bin 0x10000 .pio/build/esp32-S3/firmware.bin

# bootloader_s3.bin
|
然后就可以使用其他工具烧录合并后的 merged-flash.bin 固件了。
如何出产后内置开机 MicroBlocks 程序?
基于 MicroBlocks 制作的产品, 可能会想要内置开机程序, 用户在不连接 MicroBlocks 编程平台时, 也有默认可用的程序.
参考 @yinxi 的解决方案
MicroBlocks 的速度
@曾祥潘 老师分别测试了 Arduino、MicroBlocks、MicroPython 翻转 rpi pico 引脚的速度, MicroBlocks 的速度大约是MicroPython的 3 倍左右。以下是测试结果:
- Arduino: 885 kHz
- MicroBlocks: 251.67 kHz
- MicroPython: 88.83 kHz
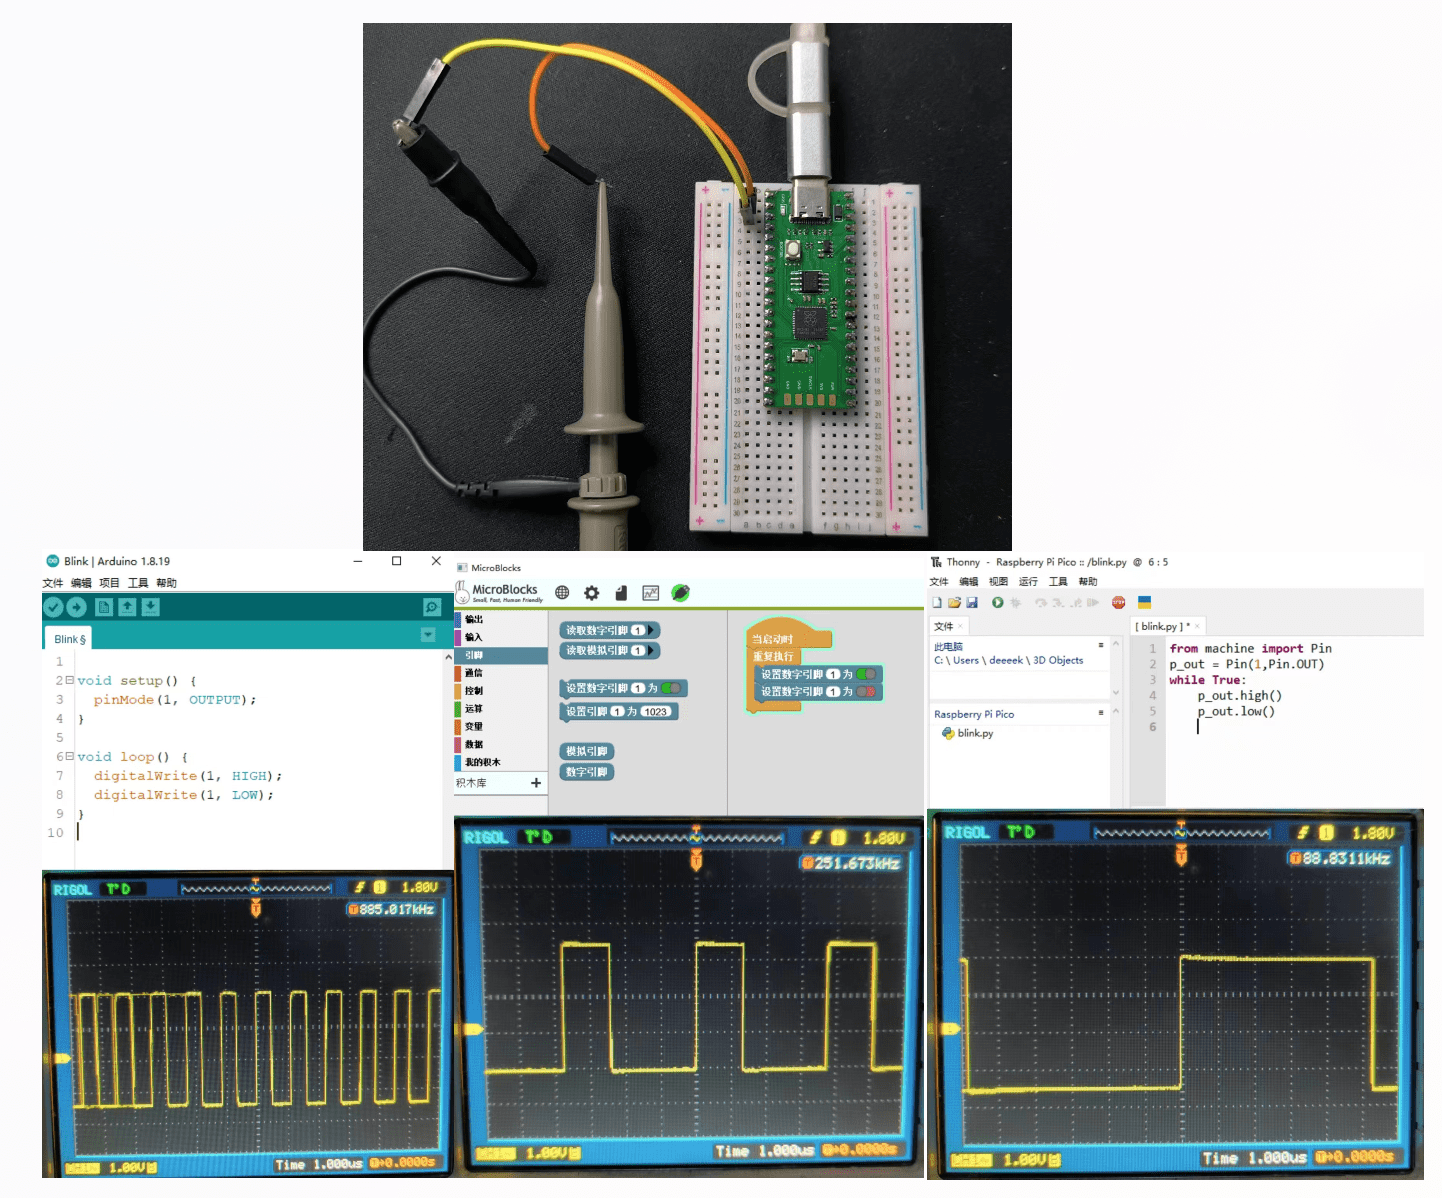
MicroBlocks 可以在 4 us(微秒)(1000,000 us/250,000 Hz)里完成一次引脚切换循环。这使得它可以支持一些要求严苛的应用, 诸如接管任天堂 SNES 控制器(需要能够工作在 6us 时间尺度里)。
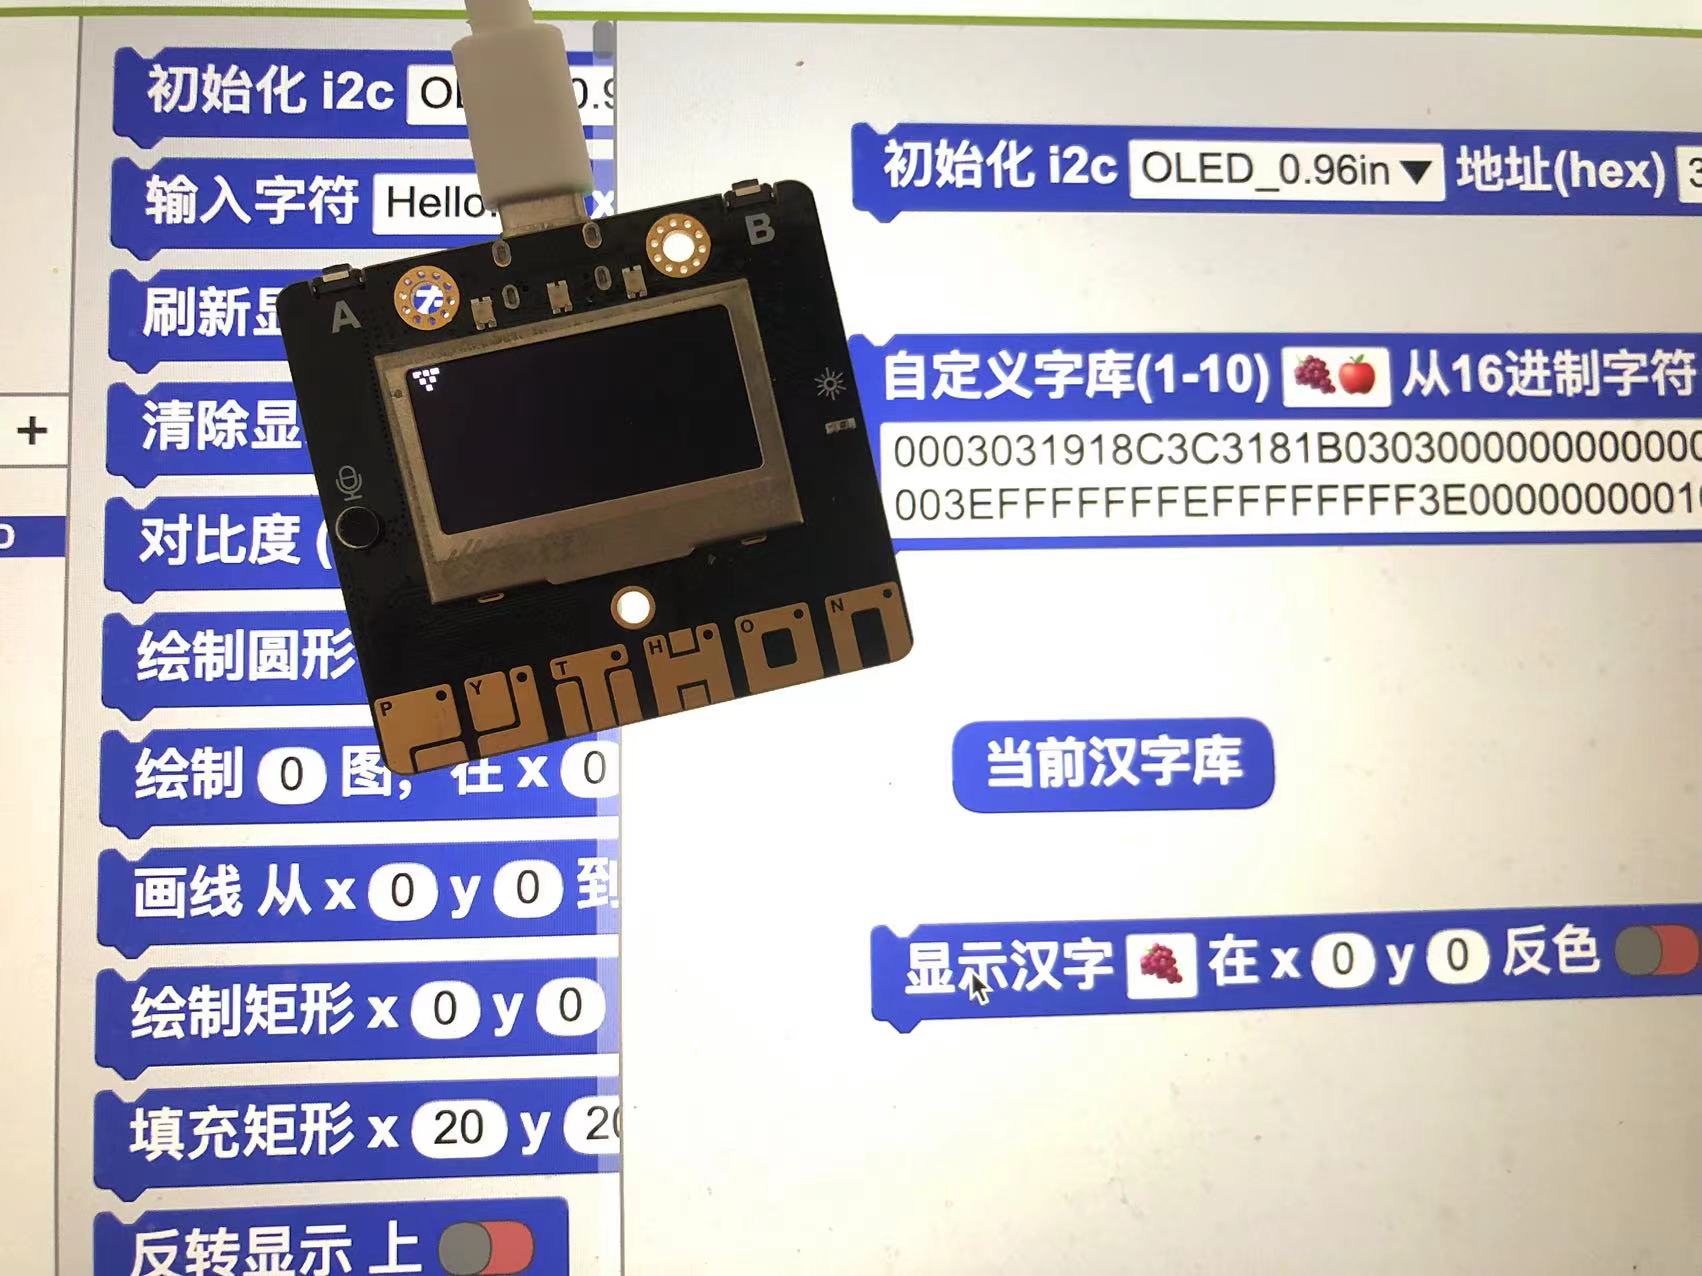
如何显示中文
参考 @Bingo 的视频分享 利用 MicroBlocks 在掌控板中显示汉字
@Bingo 分享了生成字库的 16 进制字符串的 Python 脚本: HexStr.py (使用方法参考前边视频的这个片段)。 @Bingo 提醒也可以用 PCtoLCD 软件生成。
以上方法也可用于显示 emoji: HexStr_emoji.py, 至于 MicroBlocks 方面,复用 @Bingo 提交的 OLED 汉字库即可(已内置在最新中文版本里)。需要注意的是, 在 MicroBlocks 中尽量手动输入 emoji 字符, 复制粘贴可能会有问题。
MicroBlocks IDE(图形化编程环境)
MicroBlocks IDE 基于 GP Blocks 构建。 相关代码在这儿。 通常情况下, 很少需要修改 MicroBlocks IDE。
我们之前在这个视频里讨论 MicroBlocks IDE 相关话题。
GP Blocks 目前还没有做到 Squeak 那种程度的自支持(我之前在邮件中和John Maloney确认过)。MicroBlocks IDE 的开发过程依然在代码中进行, Morphic 环境主要用于探索和实验。
开发模式
进入开发模式, 可以方便调试 morphic
./build.sh --dev
在 MacOS 下从浏览器 MicroBlocks 进入开发模式: shift + option + click
如何阅读 gp 代码
如果你想在 vscode 中阅读 gp 代码(MicroBlocks 项目文件 ubp 也是 gp 代码), 可以在 vscode 中搜索 gp-lang, 感谢 @Riven 的分享!
参考