在本文里,我们将根据官方的文档,演示如何使用devstack(docker)安装和调试open edx
环境
阿里云 香港节点
1
2
3
4
5
6
|
wwj@iZj6camqna1xyh802bdggtZ:~/devstack$ lsb_release -a
LSB Version:	core-9.20160110ubuntu0.2-amd64:core-9.20160110ubuntu0.2-noarch:security-9.20160110ubuntu0.2-amd64:security-9.20160110ubuntu0.2-noarch
Distributor ID:	Ubuntu
Description:	Ubuntu 16.04.2 LTS
Release:	16.04
Codename:	xenial
|
Getting Started
按照官方文档
1
2
3
4
5
6
7
|
git clone https://github.com/edx/devstack
cd devstack
make requirements
# 确保docker-compose安装好了 可能需要sudo权限
make dev.clone
make dev.provision
make dev.up
|
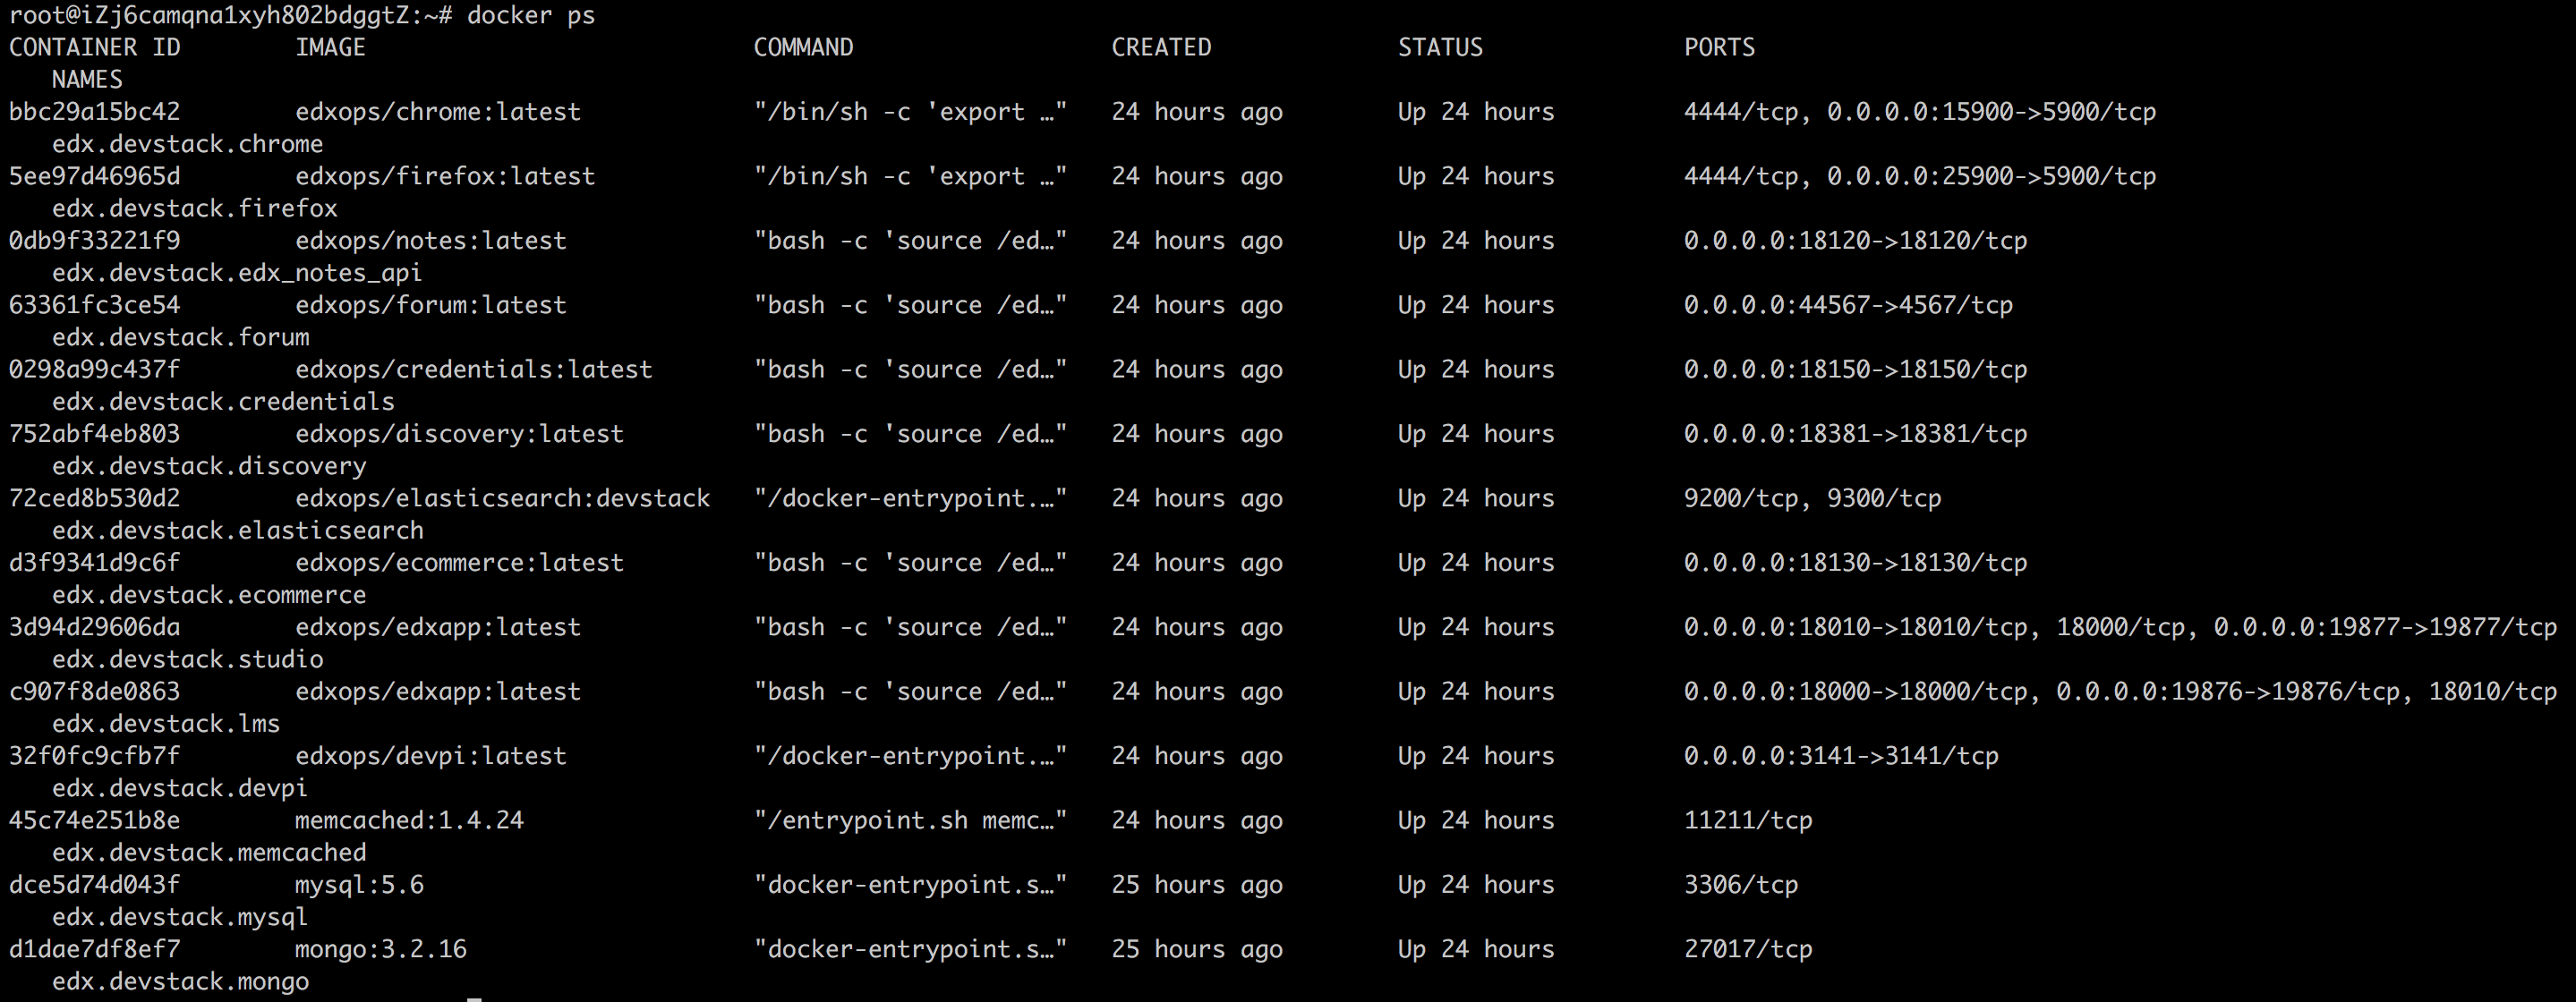
正常情况下,应该不会有问题,一切顺利之后,就会看到docker容器都跑起来了:
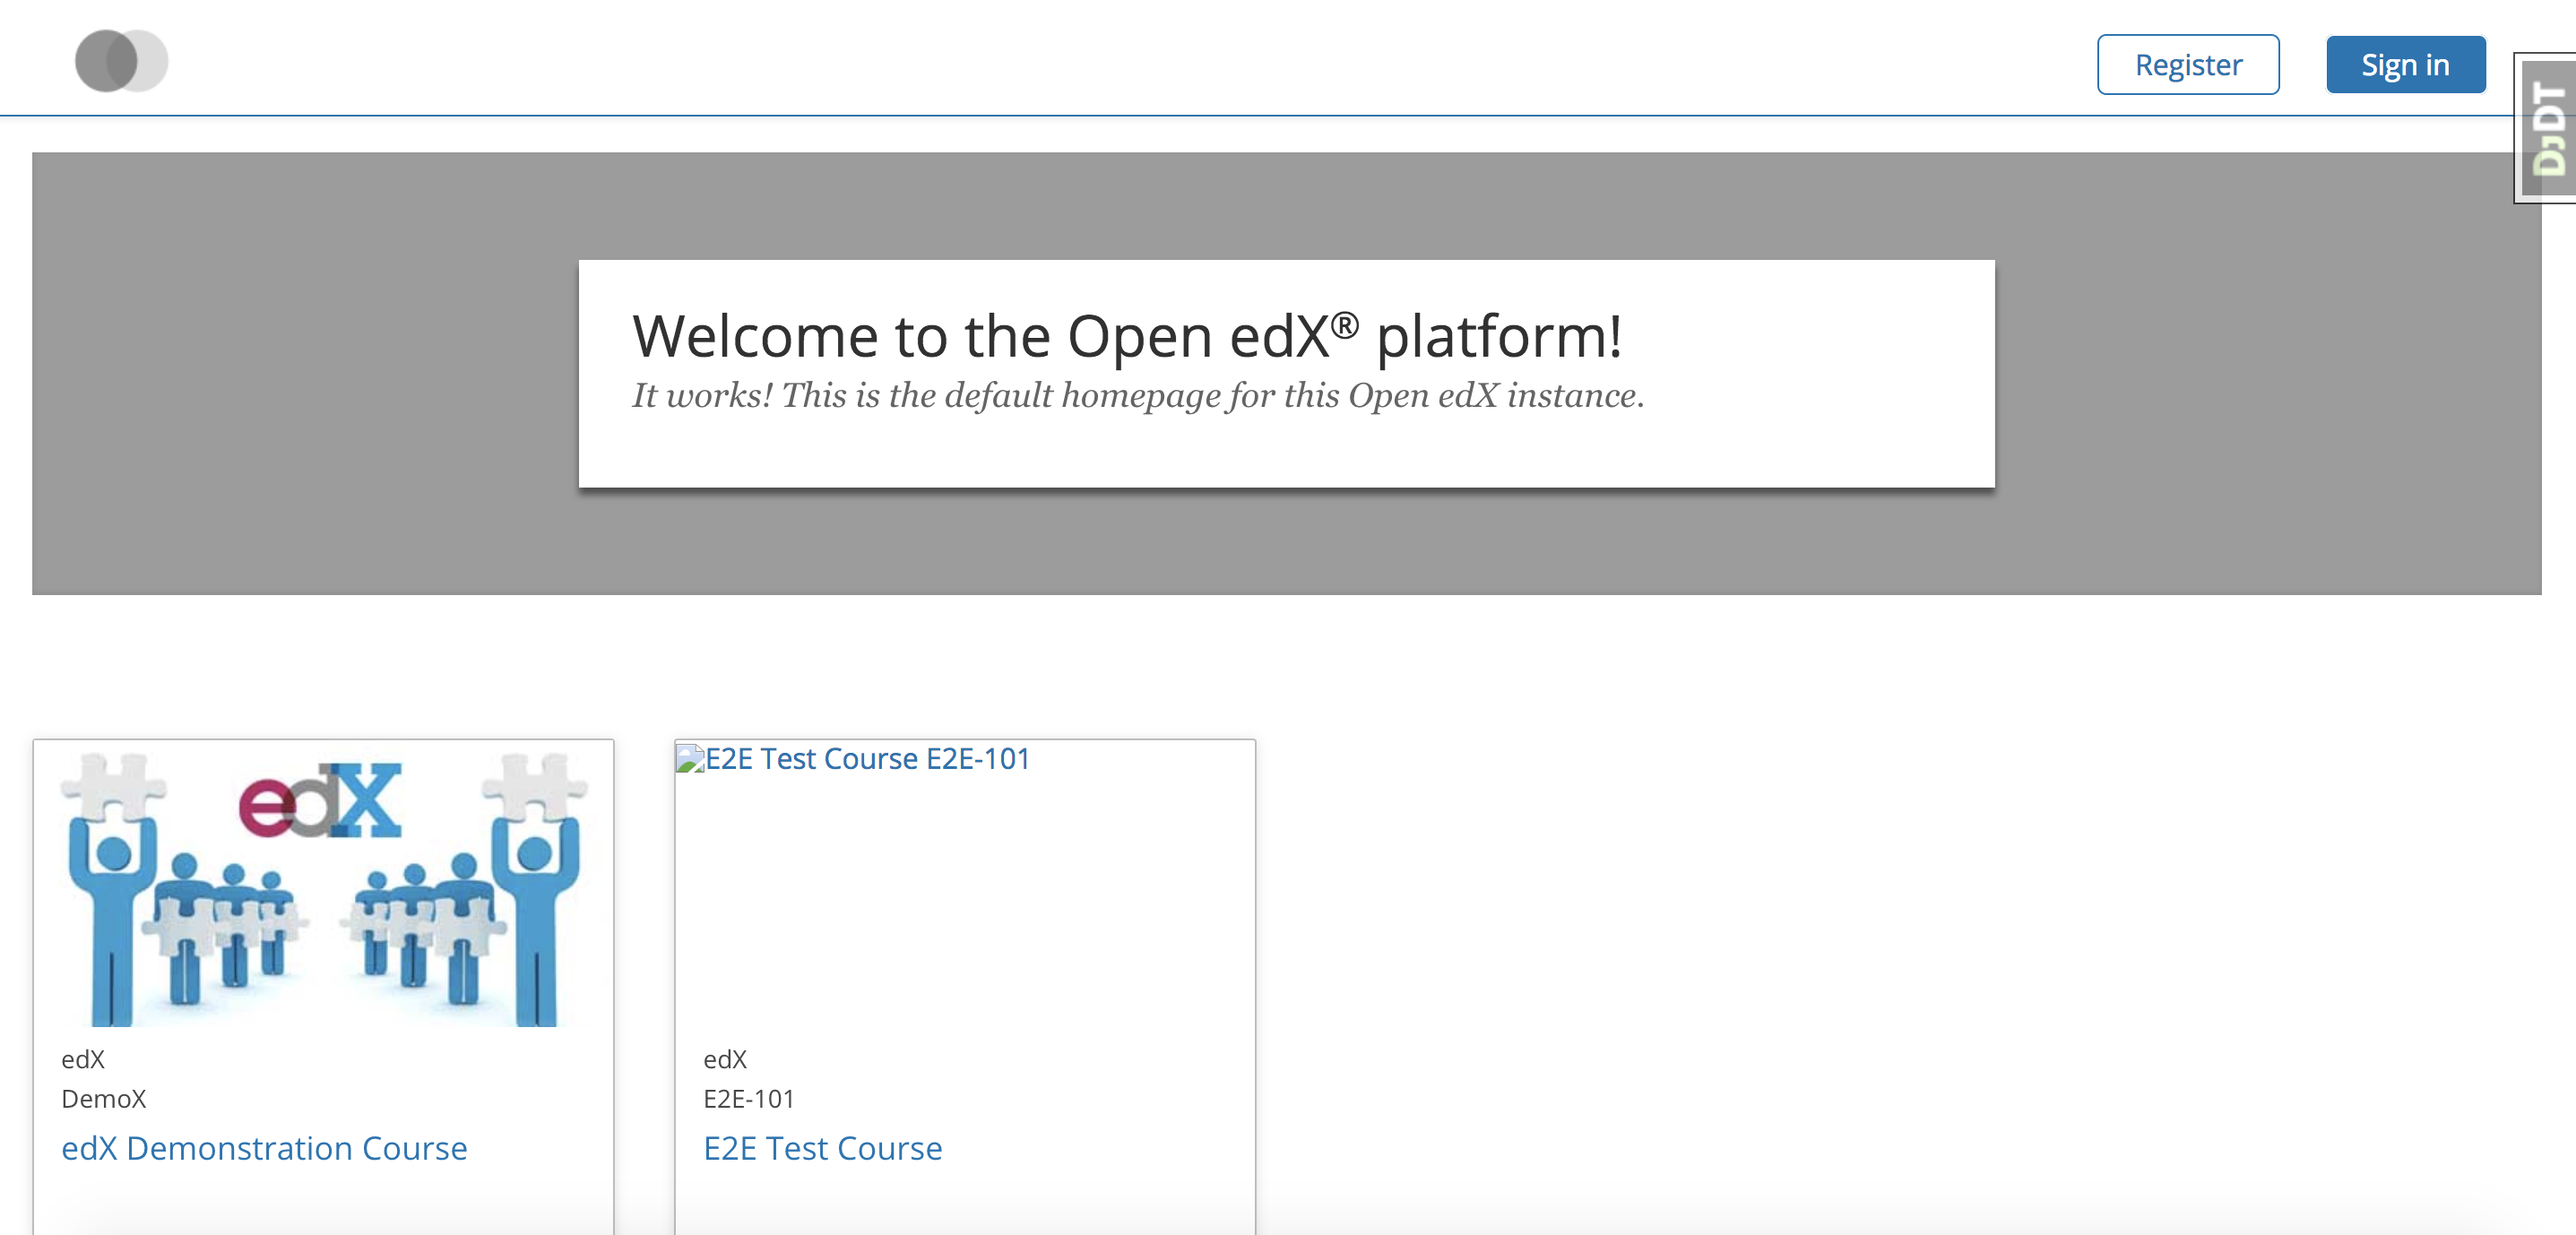
由于开发模式下,默认就接受公网请求(0.0.0.0),所以我们可以直接访问edx了,当然前提是你已经将对应的端口对外打开了,如果你不熟悉阿里云的安全策略,参考添加安全组规则
账号
默认账号与之前无异
1
2
3
|
Email: edx@example.com
Username: edx
Password: edx
|
其他的测试账号为(密码都是edx)
1
2
3
4
5
|
Username	Email
audit	    audit@example.com
honor	    honor@example.com
staff	    staff@example.com
verified	verified@example.com
|
开发
查看一些help:
 1
 2
 3
 4
 5
 6
 7
 8
 9
10
11
12
13
14
15
16
17
18
19
20
21
22
23
24
25
26
27
28
29
30
31
32
33
34
35
36
37
38
39
40
41
42
43
44
45
46
47
48
49
50
51
52
53
54
55
56
57
58
59
60
61
62
63
64
65
66
67
68
69
70
71
72
73
74
75
76
|
wwj@iZj6camqna1xyh802bdggtZ:~$ make help
  analytics-pipeline-devstack-test Run analytics pipeline tests in travis build
  analytics-pipeline-shell  Run a shell on the analytics pipeline container
  backup                    Write all data volumes to the host.
  build-courses             NOTE: marketing course creation is not available for those outside edX
  check-memory              Check if enough memory has been allocated to Docker
  clean-marketing-sync      Remove the docker-sync containers for all services (including the marketing site)
  create-test-course        NOTE: marketing course creation is not available for those outside edX
  destroy                   Remove all devstack-related containers, networks, and volumes
  dev.checkout              Check out "openedx-release/$OPENEDX_RELEASE" in each repo if set, "master" otherwise
  dev.clone                 Clone service repos to the parent directory
  dev.provision.analytics_pipeline Provision analyticstack dev environment with all services stopped
  dev.provision.run         Provision all services with local mounted directories
  dev.provision             Provision dev environment with all services stopped                                                                                                                     [21/104]
  dev.repo.reset            Attempts to reset the local repo checkouts to the master working state
  dev.reset                 Attempts to reset the local devstack to a the master working state
  dev.status                Prints the status of all git repositories
  dev.sync.daemon.start     Start the docker-sycn daemon
  dev.sync.provision        Provision with docker-sync enabled
  dev.sync.requirements     Install requirements
  dev.sync.up               Bring up all services with docker-sync enabled
  dev.up.all                Bring up all services with host volumes, including watchers
  dev.up.analytics_pipeline Bring up analytics pipeline services
  dev.up.watchers           Bring up asset watcher containers
  dev.up.xqueue             Bring up xqueue, assumes you already have lms running
  dev.up                    Bring up all services with host volumes
  devpi-password            Get the root devpi password for the devpi container
  discovery-shell           Run a shell on the discovery container
  down-marketing            Bring down all services (including the marketing site) with host volumes
  down                      Remove all service containers and networks
  ecommerce-shell           Run a shell on the ecommerce container
  healthchecks              Run a curl against all services' healthcheck endpoints to make sure they are up. This will eventually be parameterized
  help-marketing            Display this help message
  help                      Display this help message
  lms-restart               Kill the LMS Django development server. The watcher process will restart it.
  lms-shell                 Run a shell on the LMS container
  lms-static                Rebuild static assets for the LMS container
  lms-update-db             Run migrations LMS container
  lms-watcher-shell         Run a shell on the LMS watcher container
  logs                      View logs from containers running in detached mode
  marketing-shell           Run a shell on the marketing site container
  mongo-shell               Run a shell on the mongo container
  mysql-shell-edxapp        Run a mysql shell on the edxapp database
  mysql-shell               Run a shell on the mysql container
  provision                 This command will be deprecated in a future release, use dev.provision
  pull.analytics_pipeline   Update analytics pipeline docker images
  pull.xqueue               Update XQueue Docker images
  pull                      Update Docker images
  requirements              Install requirements
  restore                   Restore all data volumes from the host. WARNING: THIS WILL OVERWRITE ALL EXISTING DATA!
  static                    Rebuild static assets for all service containers
  stats                     Get per-container CPU and memory utilization data
  stop-marketing            Stop all services (including the marketing site) with host volumes
  stop.all                  Stop all containers, including asset watchers
  stop.analytics_pipeline   Stop analytics pipeline services
  stop.watchers             Stop asset watchers
  stop                      Stop all services
  studio-restart            Kill the LMS Django development server. The watcher process will restart it.
  studio-shell              Run a shell on the Studio container
  studio-static             Rebuild static assets for the Studio container
  studio-update-db          Run migrations for the Studio container
  studio-watcher-shell      Run a shell on the studio watcher container
  up-marketing-detached     Bring up all services (including the marketing site) with host volumes (in detached mode)
  up-marketing-sync         Bring up all services (including the marketing site) with docker-sync
  up-marketing              Bring up all services (including the marketing site) with host volumes
  update-db                 Run the migrations for all services
  upgrade                   Upgrade requirements with pip-tools
  validate-lms-volume       Validate that changes to the local workspace are reflected in the LMS container
  validate                  Validate the devstack configuration
  vnc-passwords             Get the VNC passwords for the Chrome and Firefox Selenium containers
  xqueue-logs               View logs from containers running in detached mode
  xqueue-restart            Kill the XQueue development server. The watcher process will restart it.
  xqueue-shell              Run a shell on the XQueue container
  xqueue_consumer-logs      View logs from containers running in detached mode
  xqueue_consumer-restart   Kill the XQueue development server. The watcher process will restart it.
  xqueue_consumer-shell     Run a shell on the XQueue consumer container
|
开发与调试
在docker开发和调试open edx,和在vargant下区别不大。
edx-platform默认被clone在用户home目录下
我们以一个最简单的例子开始
url为/hello的链接目前不存在。
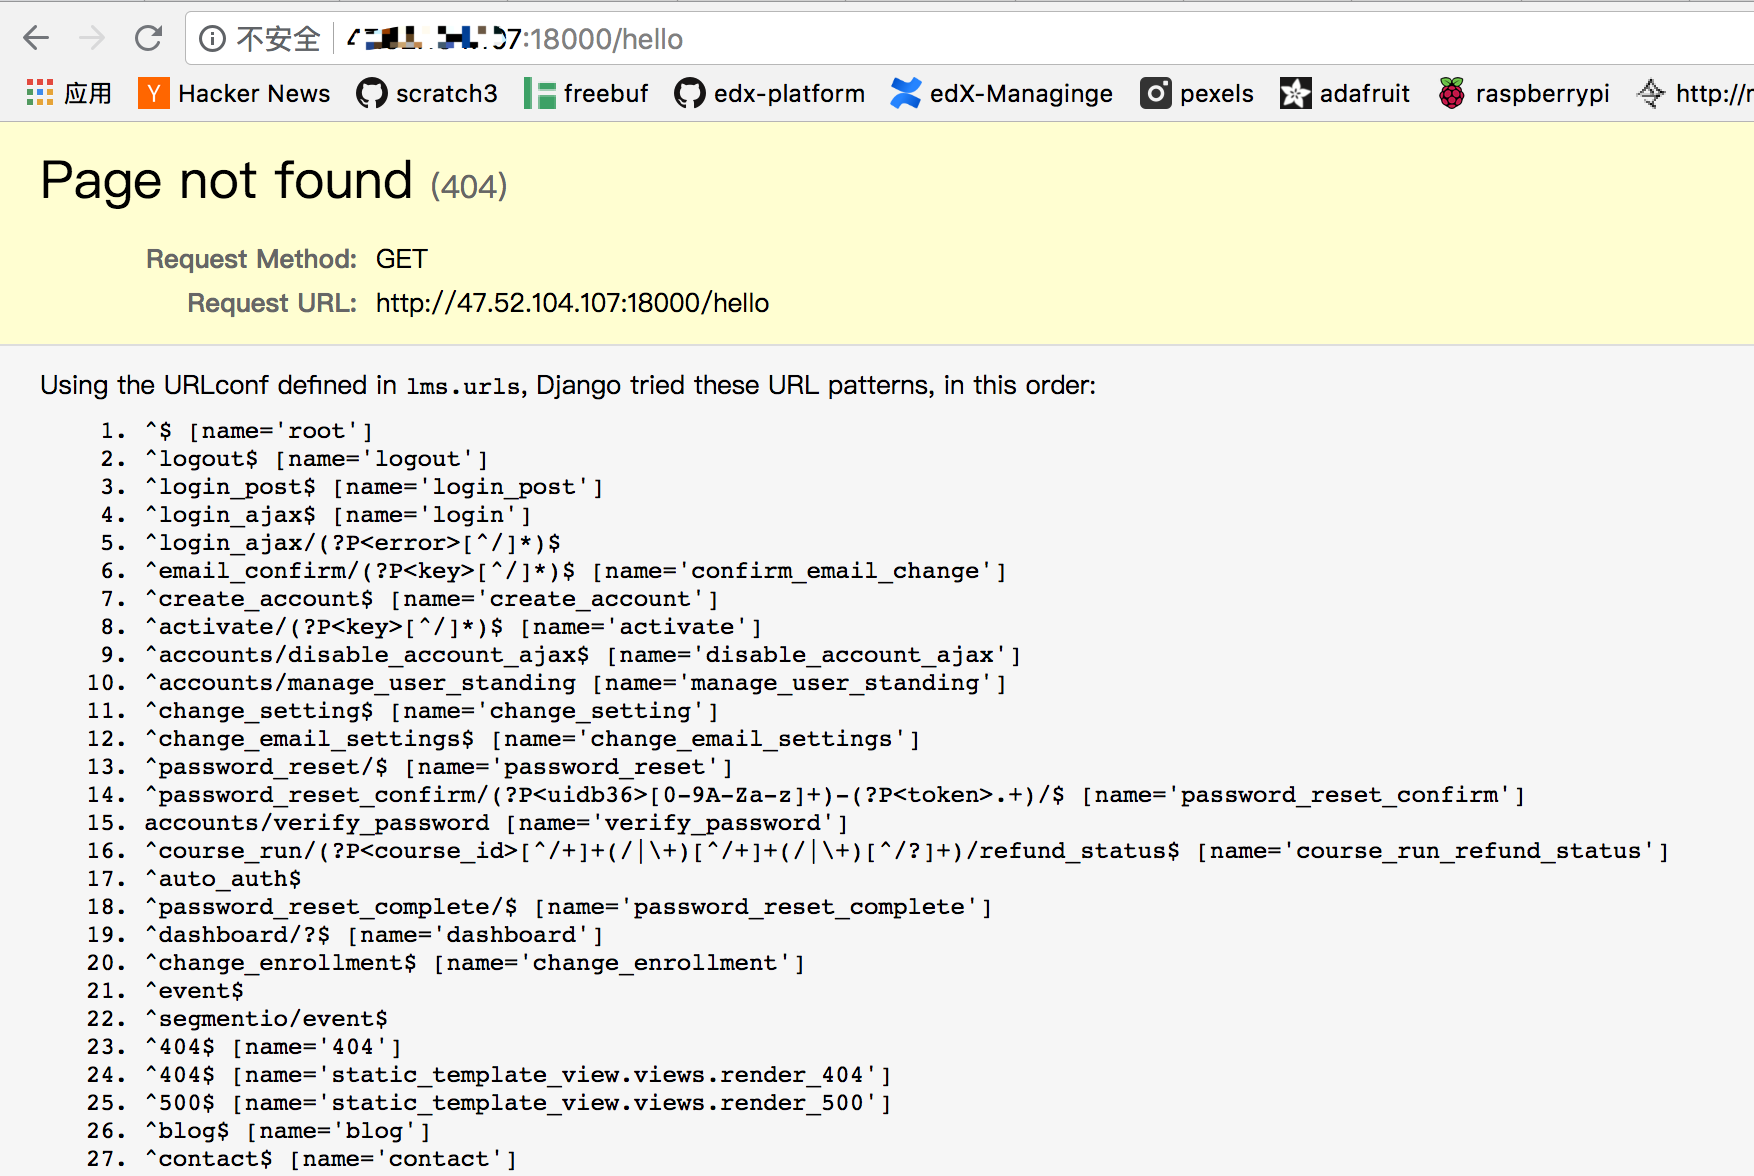
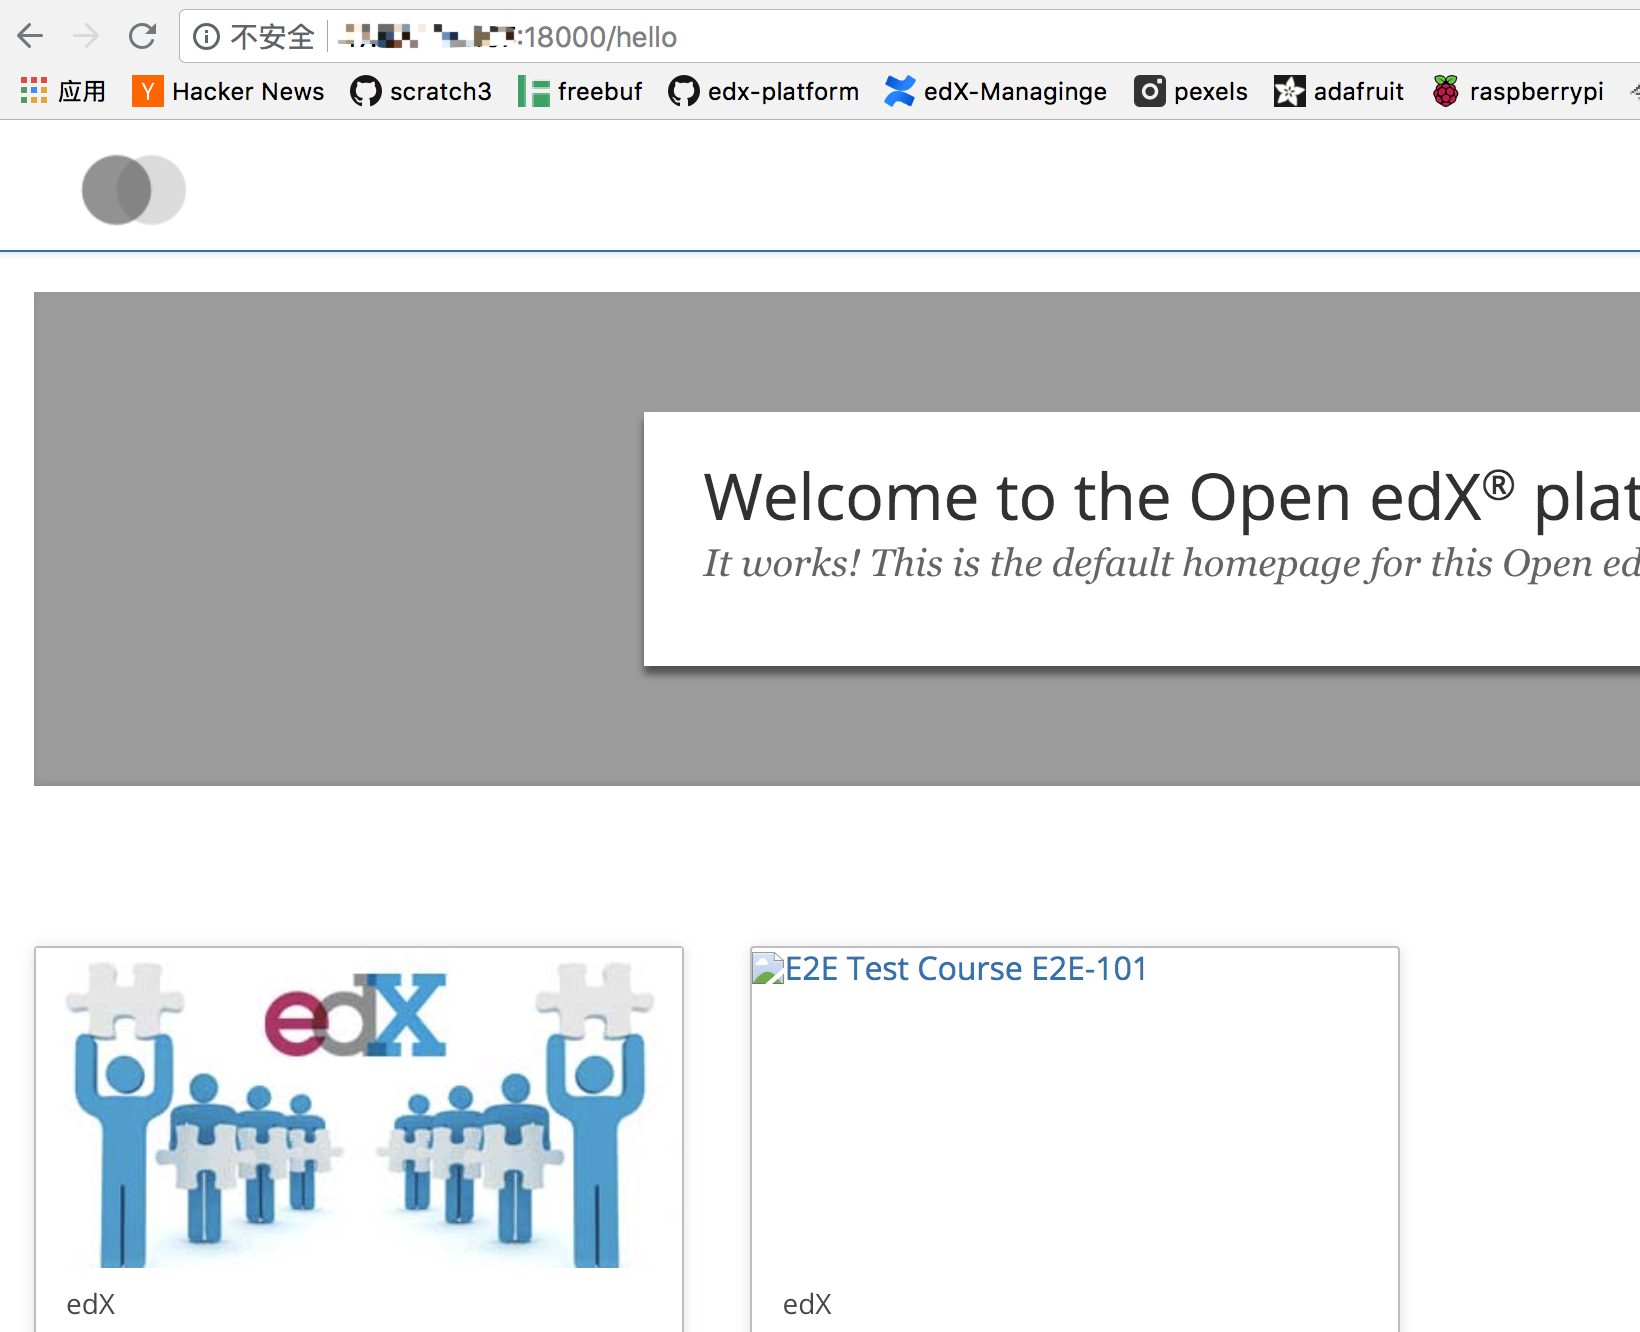
我们来试着添加这个链接,编辑vim ~/edx-platform/lms/urls.py,我们让/hello指向默认的root页面
1
|
url(r'^hello$', branding_views.index, name='root'),
|
在devstack目录下重启lms:make lms-restart
走通了最小例子之后,其他的开发过程类似
翻译
前几天群里在讨论,基于docker的open edx,如何翻译。
我目前基于docker跑起来的open-edx使用的是官方的devstack
如果你采用openedx-docker,想来流程也相似
我觉得这是个很好的例子,演示以前的开发技能如何迁移到docker环境下。其实变化非常小
在以前的开发模式下,翻译的流程见官方文档:Internationalization and localization
在docker下操作为:
进入工作环境
在devstack目录里运行make lms-shell进入工作环境(lms容器中)
编辑~/.transifexrc
之后的步骤几乎和之前完全相同
进入open edx的python环境和工作目录
1
2
|
source /edx/app/edxapp/edxapp_env
cd /edx/app/edxapp/edx-platform
|
开始编辑:vim ~/.transifexrc
1
2
3
4
5
|
[https://www.transifex.com]
api_hostname = https://api.transifex.com
hostname = https://www.transifex.com
password = 1/5f2bc554e8a1ae0c4cc9b2ee0541dafbe65330db
username = api
|
我将我的token直接分享过来,大家复制张贴即可,免去大家注册账号、加入open edx小组、获取token之类的操作
从云中拉翻译文件
paver i18n_robot_pull
更多翻译相关的操作参考Internationalization and localization
总结
翻译的过程展示了,基于docker的环境和之前几乎没有差异!