前言
近期需要把 Scratch 的一些蓝牙(BLE)插件迁移到 Snap! 里。 – Snap! 蓝牙驱动库
虽然新的 BLE 设备喜欢采用 Web Bluetooth API(诸如 microbit more), 但依然有许多 BLE 设备是通过 Scratch Link 接入 Scratch 的。
我们在之前的文章里,已经将 Web Bluetooth API 包装为 Snap! BLE primitives。为了将 Scratch Link 兼容的设备接入 Snap! , 需要弄清楚 Scratch Link 采用的通信机制(包括编解码)。弄清这些 Scratch 插件在 write/read/notify 操作在字节层面的细节, 我们就能够使用 Snap! BLE primitives 制作相同功能。
让我们试着将 Scratch 官方的 micro:bit 插件 迁移到 Snap!
一旦完成这个实验, 迁移其他的 Scratch Link 插件就轻而易举了。
分析
The challenge is not building it but understanding it – Bret 《Seeing Spaces》
Scratch Link 是一个蓝牙消息中继器, 在系统蓝牙接口与 Scratch 之间中转蓝牙消息。
我们之前在 分析 scratch3.0 与 micro:bit 的通信一文中分析了消息中转过程的细节。其中的有一处需要注意: Scratch 与 Scratch Link 通信的数据采用 Base64 格式, 而 Scratch Link 与 蓝牙设备的通信数据采用 uint8array。
micro:bit more 的作者通过 ble-web.js 实现了基于 Web Bluetooth API 的 Scratch Link。 通过阅读 ble-web.js , 我们能够更加清楚地知道 Scratch Link 做了什么。
Snap! BLE primitives 能够直接操作 uint8array(映射为 list), 所以在 Snap! 编写 BLE 插件, 要比使用 Scratch Link, ble-web.js 简易清晰得多!
开始迁移
BLE API 主要围绕对 Characteristic 进行 read/write/notify 来操作而构建。 – Snap! 蓝牙驱动库
本文的重点是展示原理, 希望突出重点,并且希望篇幅简短。所以我们只迁移这三个典型的积木。
Scratch 中使用的大多数 BLE 插件都是推(push)模式(NOTIFY) – Snap! 蓝牙驱动库
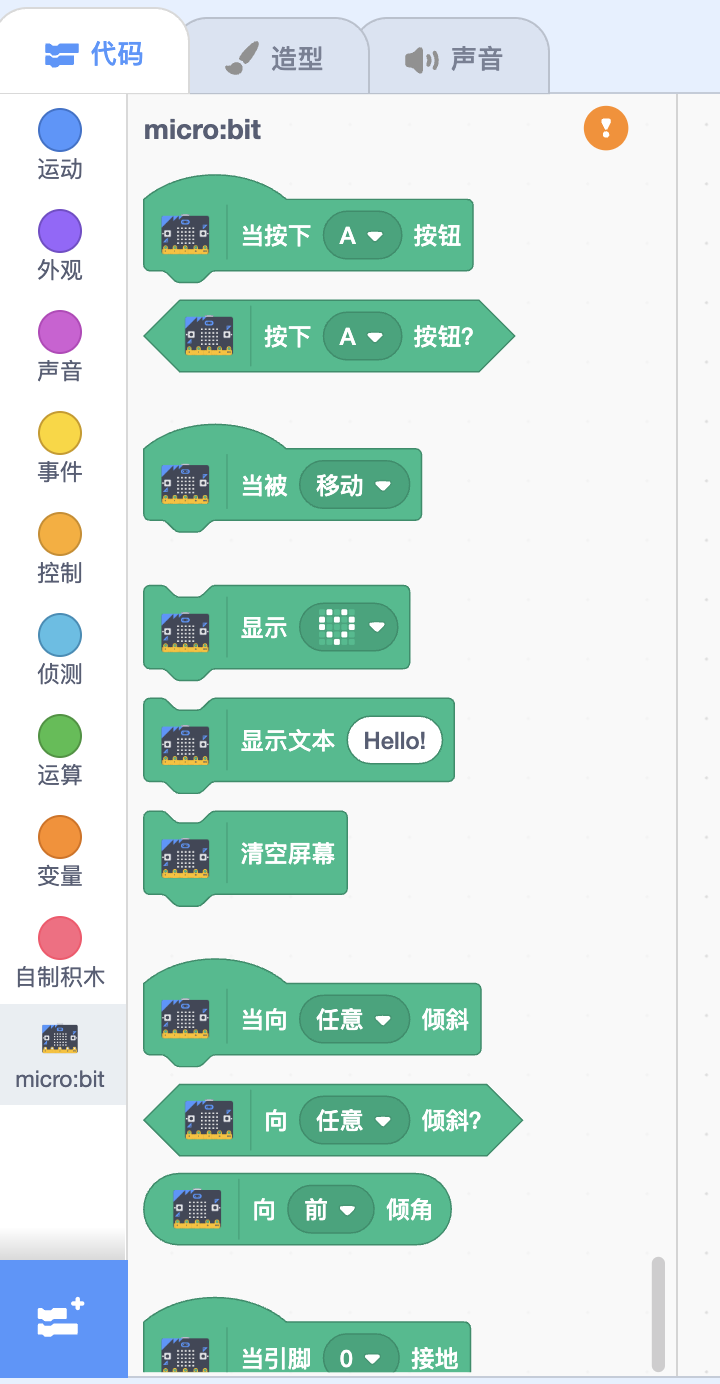
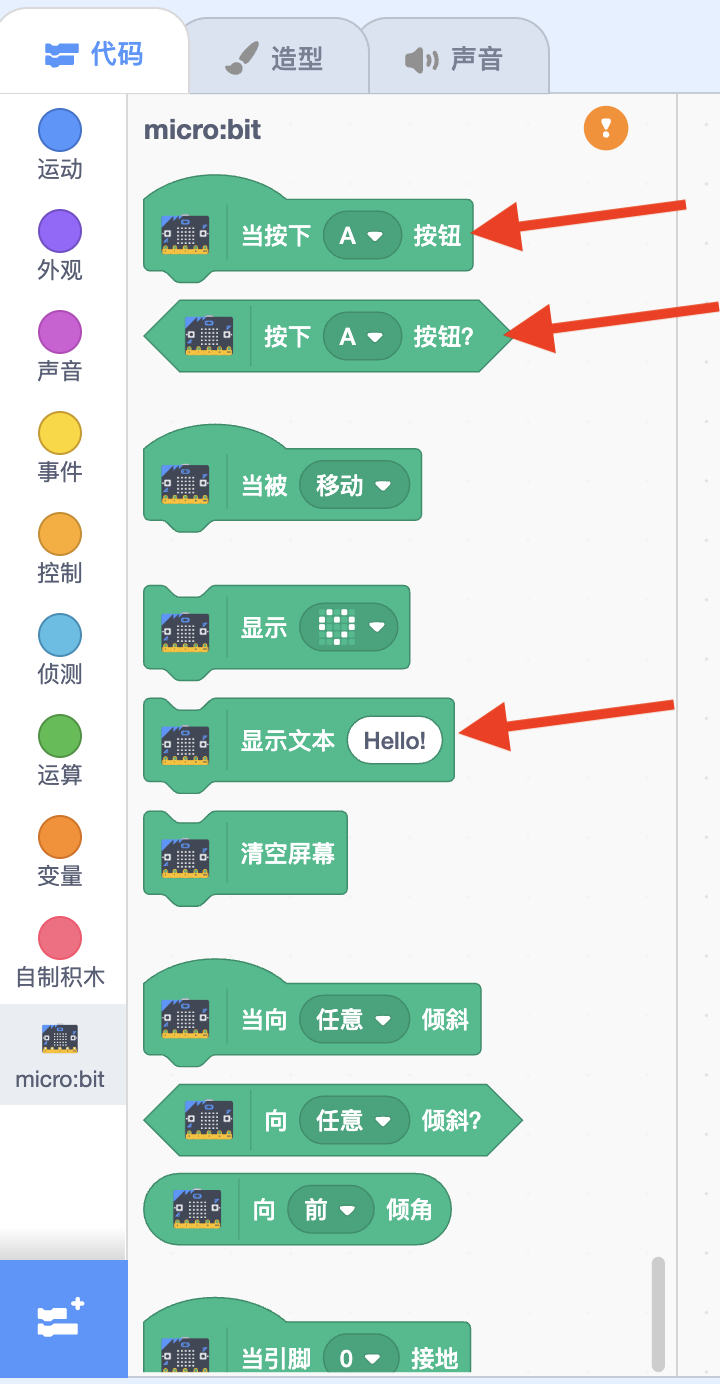
前 2 个与按下按钮相关的积木都基于 BLE notify 实现; 显示文本积木, 基于 BLE write 实现。
建立连接
首先, 我们需要建立与 BLE 设备的连接, 并且弄清楚 read/notify/write 对应的 Characteristic
以下代码 给了我们这些信息:
 1
 2
 3
 4
 5
 6
 7
 8
 9
10
11
12
13
|
// https://github.com/scratchfoundation/scratch-vm/blob/v2.1.16/src/extensions/scratch3_microbit/index.js#L53

/**
 * Enum for micro:bit protocol.
 * https://github.com/scratchfoundation/scratch-microbit-firmware/blob/master/protocol.md
 * @readonly
 * @enum {string}
 */
const BLEUUID = {
    service: 0xf005,
    rxChar: '5261da01-fa7e-42ab-850b-7c80220097cc',
    txChar: '5261da02-fa7e-42ab-850b-7c80220097cc'
};
|
显示文本积木
与 显示文本积木相关的 javascript 代码为
 1
 2
 3
 4
 5
 6
 7
 8
 9
10
11
12
13
14
15
16
17
18
19
20
21
22
23
24
25
26
27
28
29
30
31
32
33
34
35
36
37
38
39
40
41
42
43
44
45
46
47
48
49
50
51
52
53
54
55
56
57
58
59
60
61
62
63
64
|
/**
 * Enum for micro:bit BLE command protocol.
 * https://github.com/scratchfoundation/scratch-microbit-firmware/blob/master/protocol.md
 * @readonly
 * @enum {number}
 */
const BLECommand = {
    CMD_PIN_CONFIG: 0x80,
    CMD_DISPLAY_TEXT: 0x81,
    CMD_DISPLAY_LED: 0x82
};

...

/**
 * @param {string} text - the text to display.
 * @return {Promise} - a Promise that resolves when writing to peripheral.
 */
displayText(text) {
    const output = new Uint8Array(text.length);
    for (let i = 0; i < text.length; i++) {
        output[i] = text.charCodeAt(i);
    }
    return this.send(BLECommand.CMD_DISPLAY_TEXT, output);
}

...


/**
     * Send a message to the peripheral BLE socket.
     * @param {number} command - the BLE command hex.
     * @param {Uint8Array} message - the message to write
     */
send(command, message) {
    if (!this.isConnected()) return;
    if (this._busy) return;

    // Set a busy flag so that while we are sending a message and waiting for
    // the response, additional messages are ignored.
    this._busy = true;

    // Set a timeout after which to reset the busy flag. This is used in case
    // a BLE message was sent for which we never received a response, because
    // e.g. the peripheral was turned off after the message was sent. We reset
    // the busy flag after a while so that it is possible to try again later.
    this._busyTimeoutID = window.setTimeout(() => {
        this._busy = false;
    }, 5000);

    const output = new Uint8Array(message.length + 1);
    output[0] = command; // attach command to beginning of message
    for (let i = 0; i < message.length; i++) {
        output[i + 1] = message[i];
    }
    const data = Base64Util.uint8ArrayToBase64(output);

    this._ble.write(BLEUUID.service, BLEUUID.txChar, data, 'base64', true).then(
        () => {
            this._busy = false;
            window.clearTimeout(this._busyTimeoutID);
        }
    );
}
|
有了这些信息, 我们可以在 Snap! 中尝试制作相关积木:
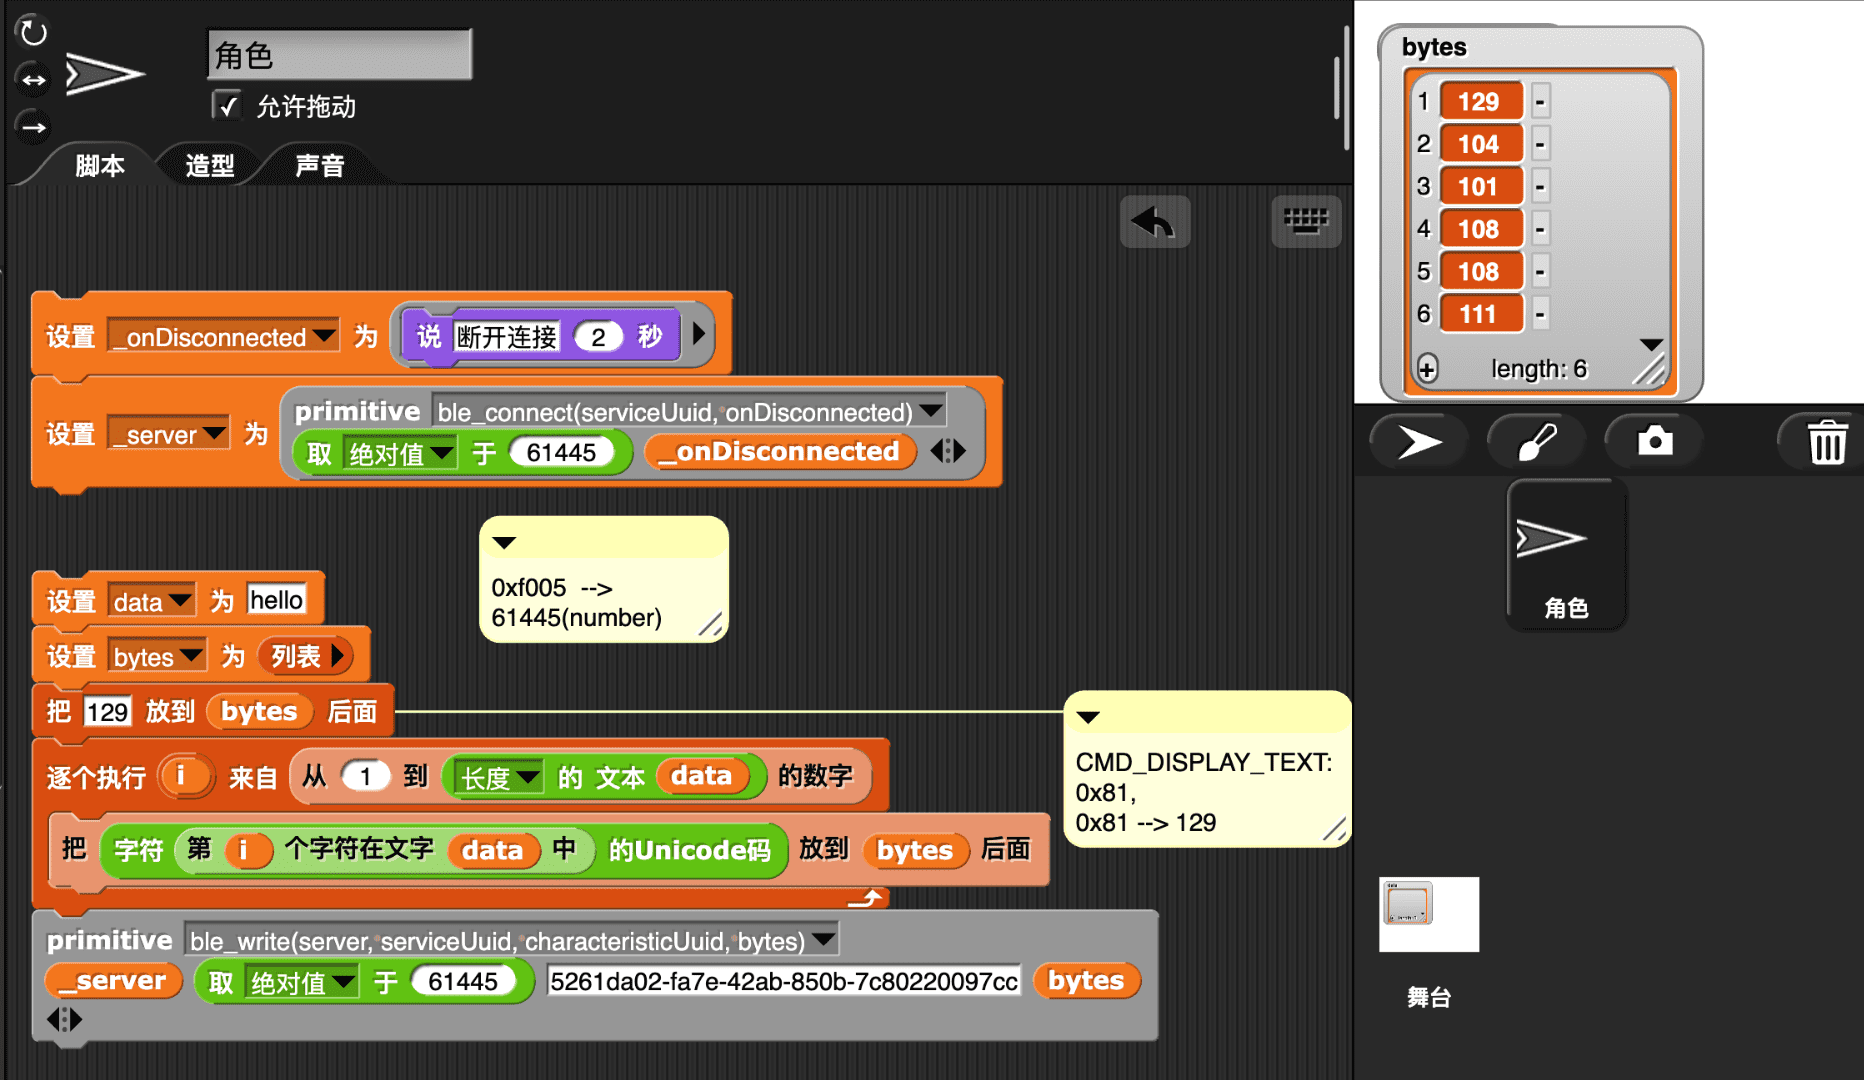
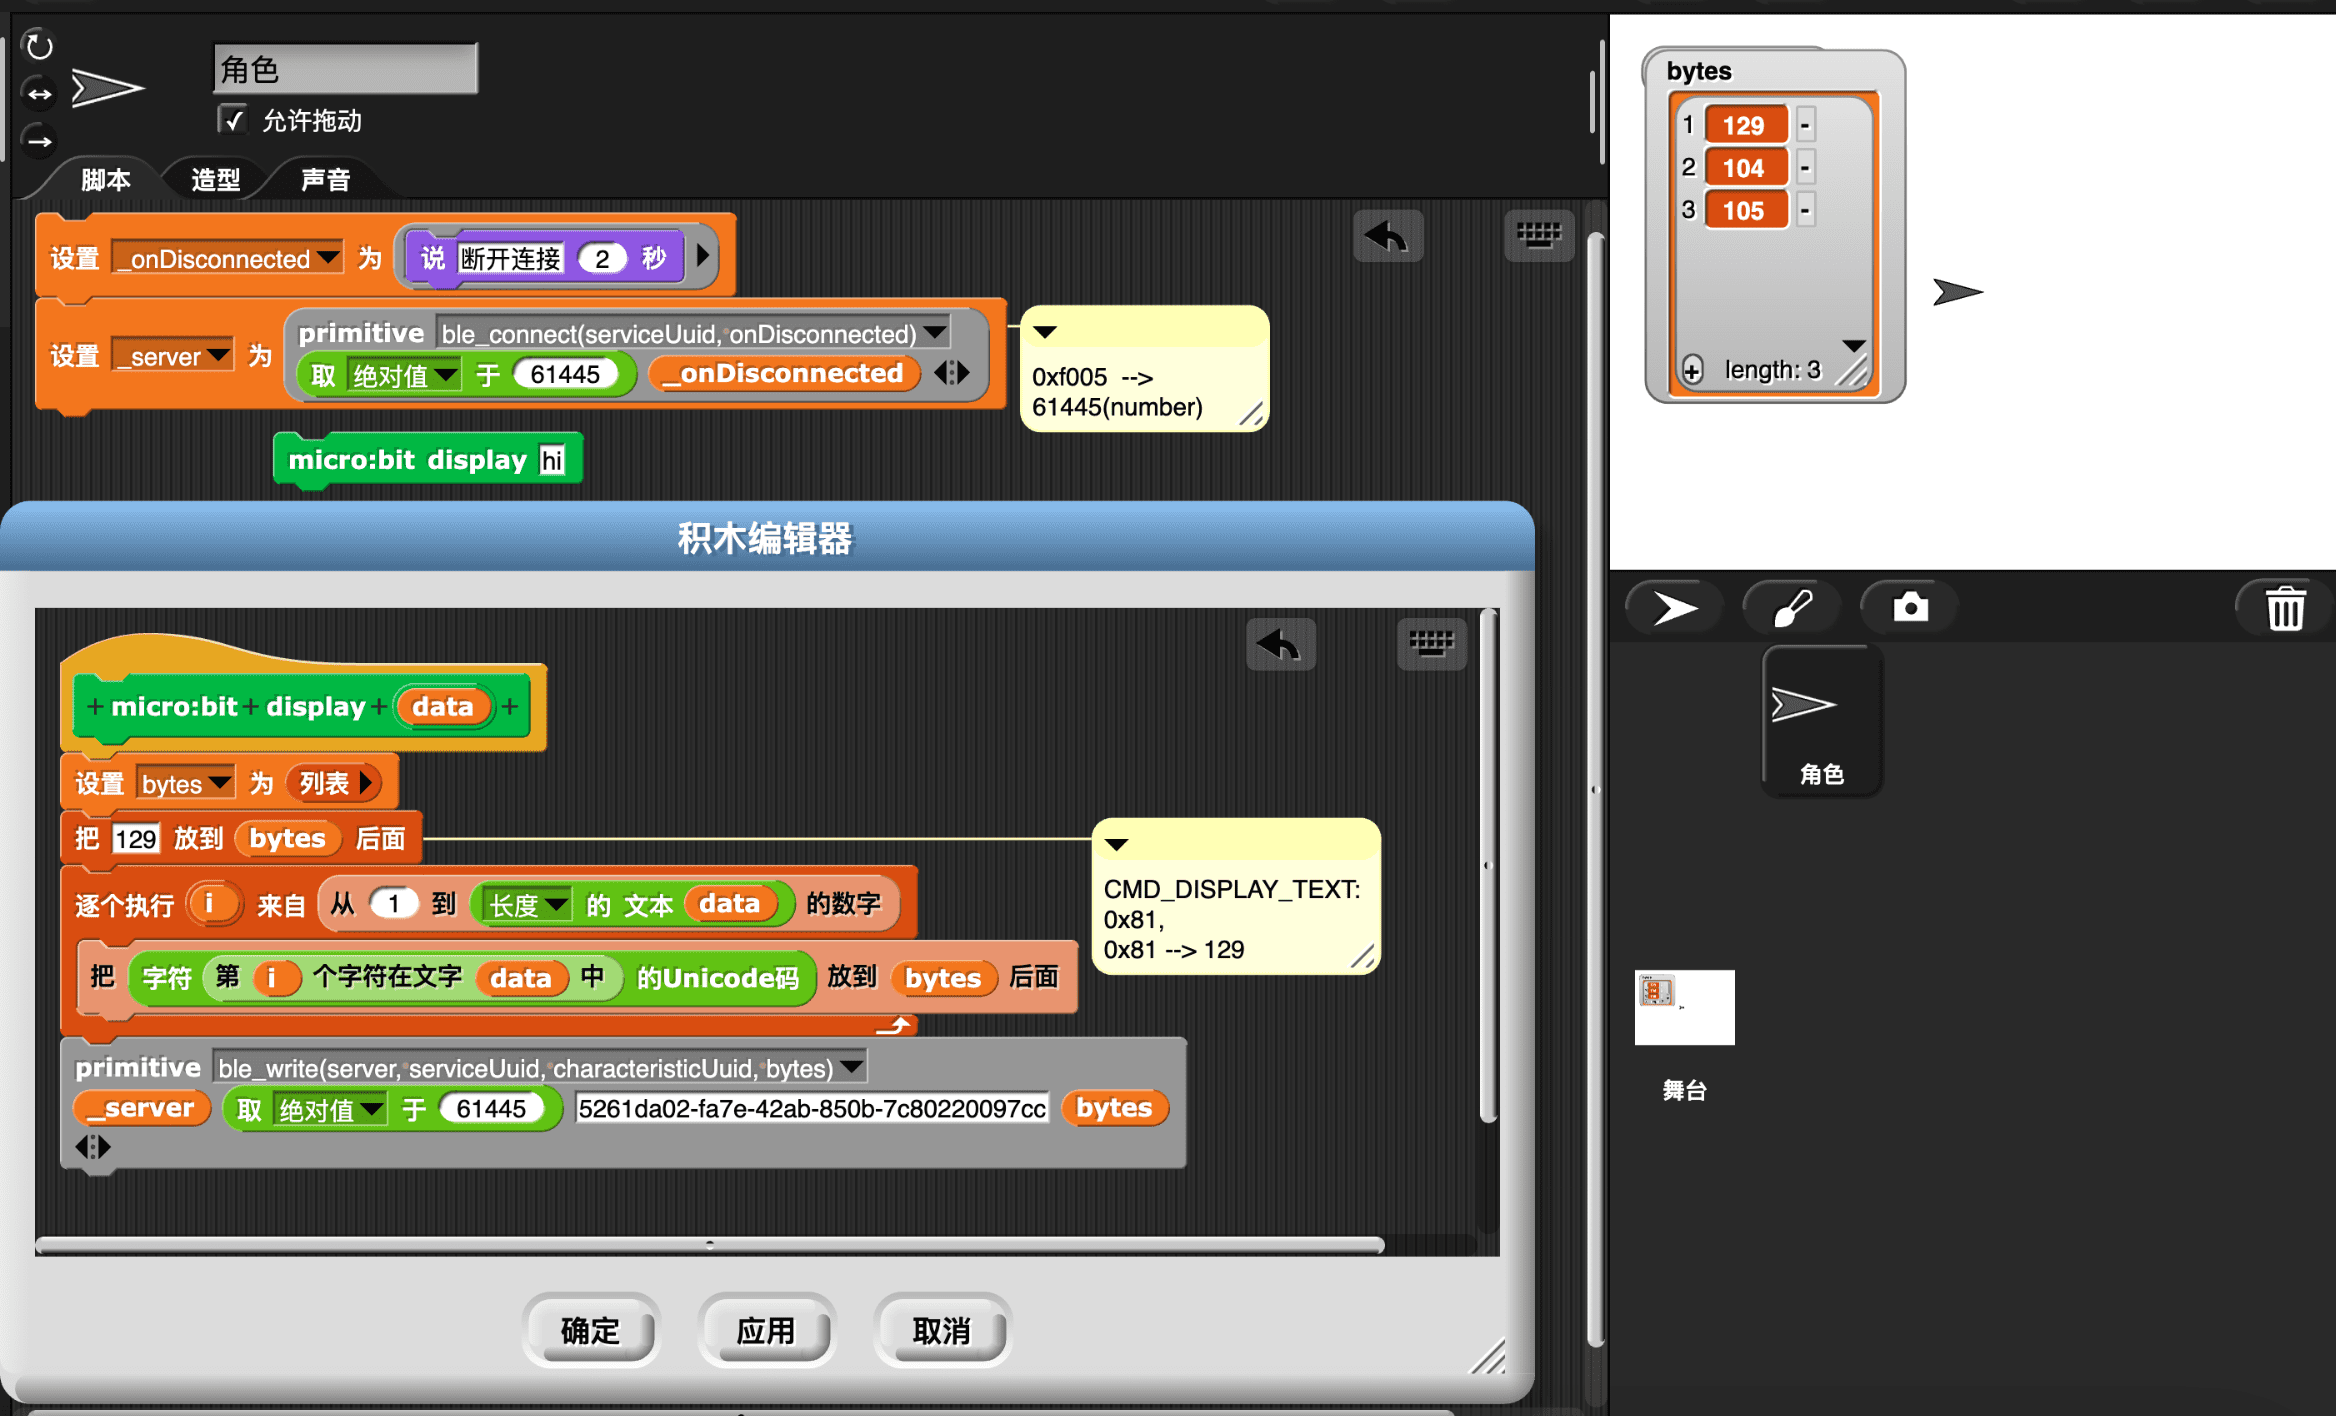
以上便完成了显示文本积木的功能, 所有工作都构建在我们之前的 BLE primitives 里, 没有写一行 js 代码。让我们将其包装到一个自定义积木里:
按下按钮积木
按下按钮这一类的的事件, 通常在 Scratch 中会呈现为 2 中积木: hat 和 reporter。
这是一种冗余, 仅使用 reporter 积木便足够。 通过一个通用的 when 积木, reporter 可以转化为 hat 。 Snap! 采用这种更简洁和通用的设计。
所以在 Snap! 中只需要实现 reporter 版本的按下按钮积木即可.
 1
 2
 3
 4
 5
 6
 7
 8
 9
10
11
12
13
14
15
16
17
18
19
20
21
22
23
24
25
26
27
28
29
30
31
32
33
34
35
36
37
38
39
40
41
42
43
44
45
46
47
48
|
/**
 * Process the sensor data from the incoming BLE characteristic.
 * @param {object} base64 - the incoming BLE data.
 * @private
 */
_onMessage(base64) {
    // parse data
    const data = Base64Util.base64ToUint8Array(base64);

    this._sensors.tiltX = data[1] | (data[0] << 8);
    if (this._sensors.tiltX > (1 << 15)) this._sensors.tiltX -= (1 << 16);
    this._sensors.tiltY = data[3] | (data[2] << 8);
    if (this._sensors.tiltY > (1 << 15)) this._sensors.tiltY -= (1 << 16);

    this._sensors.buttonA = data[4];
    this._sensors.buttonB = data[5];

    this._sensors.touchPins[0] = data[6];
    this._sensors.touchPins[1] = data[7];
    this._sensors.touchPins[2] = data[8];

    this._sensors.gestureState = data[9];

    // cancel disconnect timeout and start a new one
    window.clearTimeout(this._timeoutID);
    this._timeoutID = window.setTimeout(
        () => this._ble.handleDisconnectError(BLEDataStoppedError),
        BLETimeout
    );
}

...

/**
 * Test whether the A or B button is pressed
 * @param {object} args - the block's arguments.
 * @return {boolean} - true if the button is pressed.
 */
isButtonPressed(args) {
    if (args.BTN === 'any') {
        return (this._peripheral.buttonA | this._peripheral.buttonB) !== 0;
    } else if (args.BTN === 'A') {
        return this._peripheral.buttonA !== 0;
    } else if (args.BTN === 'B') {
        return this._peripheral.buttonB !== 0;
    }
    return false;
}
|
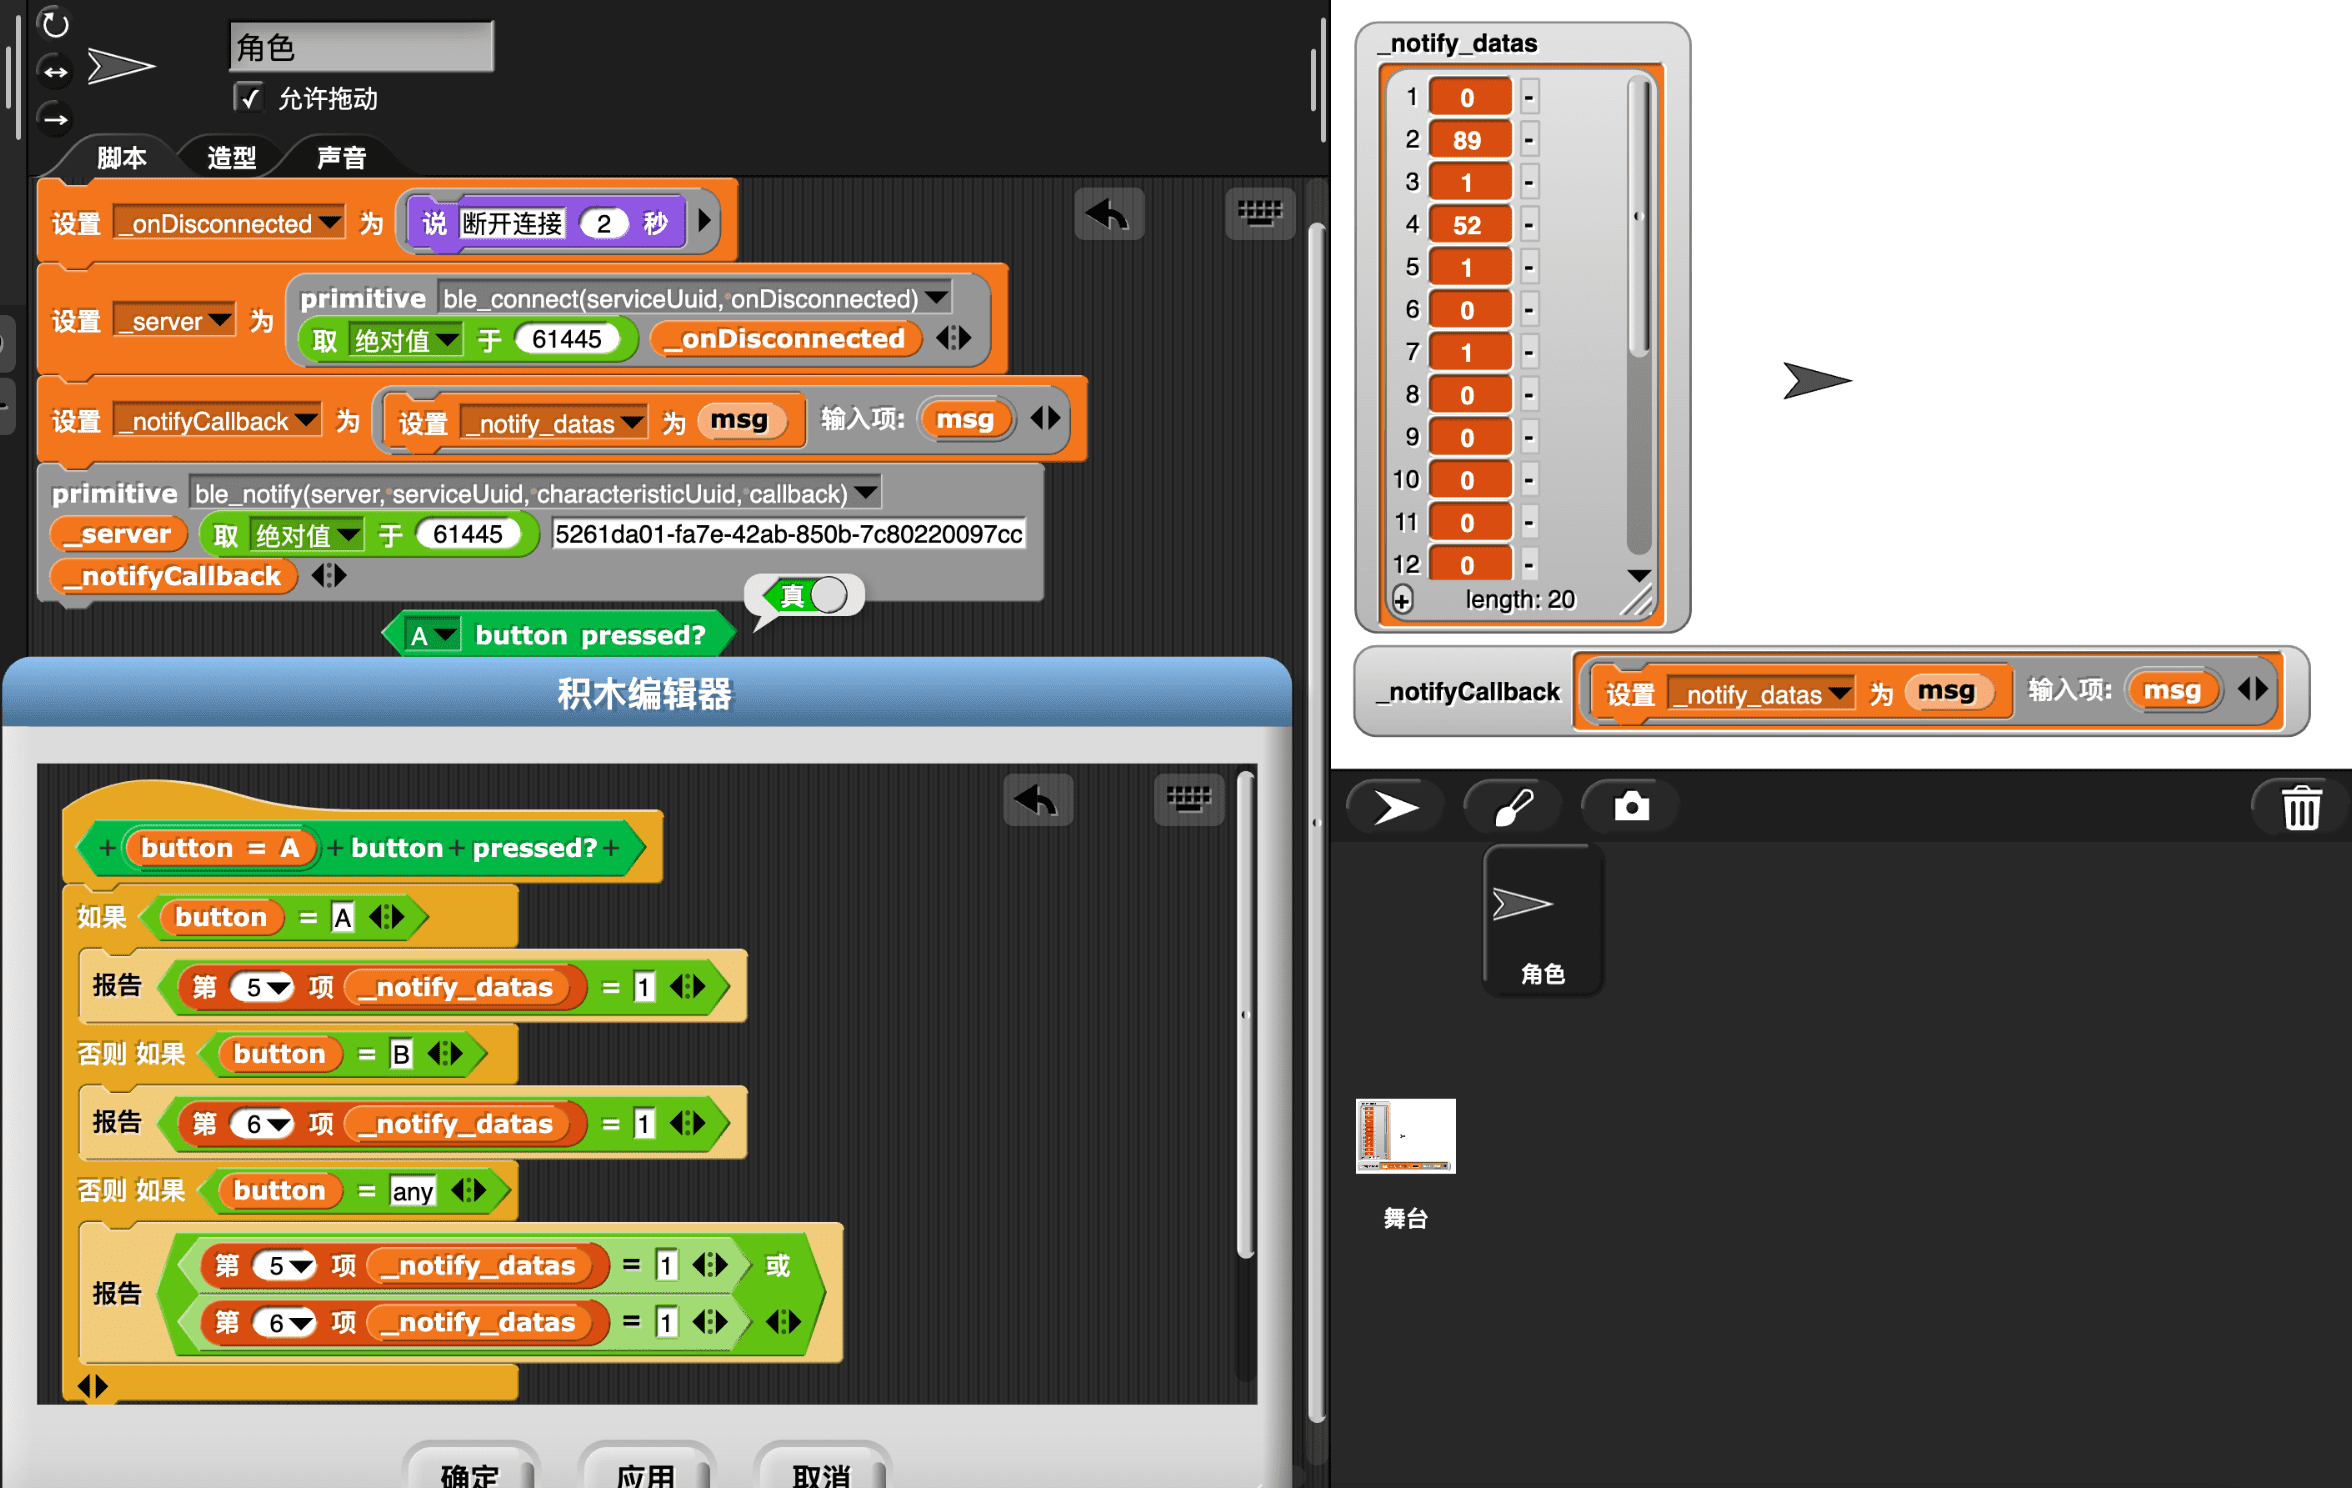
有了这些信息, 我们可以在 Snap! 中尝试制作相关积木。以下是 A 按键按下时, 收到的数据(第 5 位代表 A 按键状态, Snap! 列表计数从 1 开始):
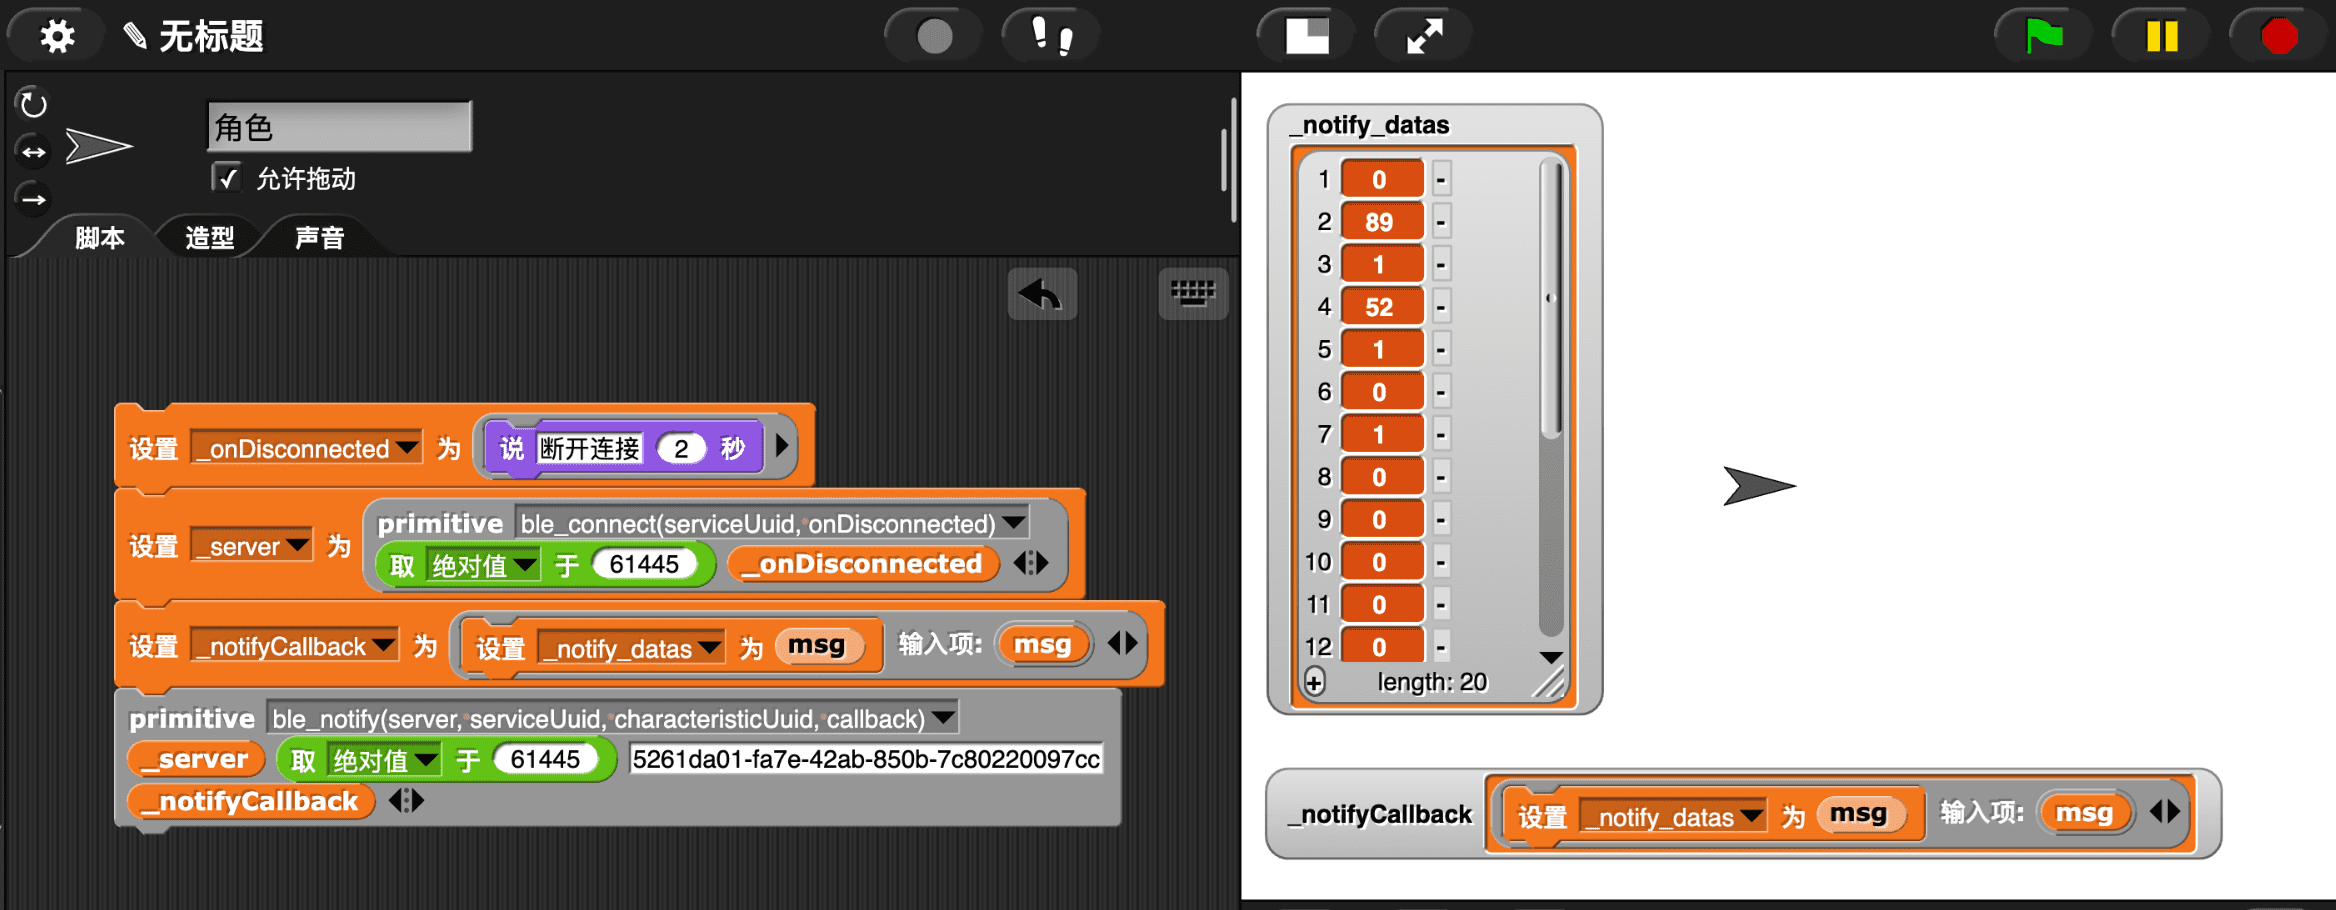
将其包装到一个自定义积木里:
代码的清晰性和简易性, 都比 Scratch 提升一个数量级!
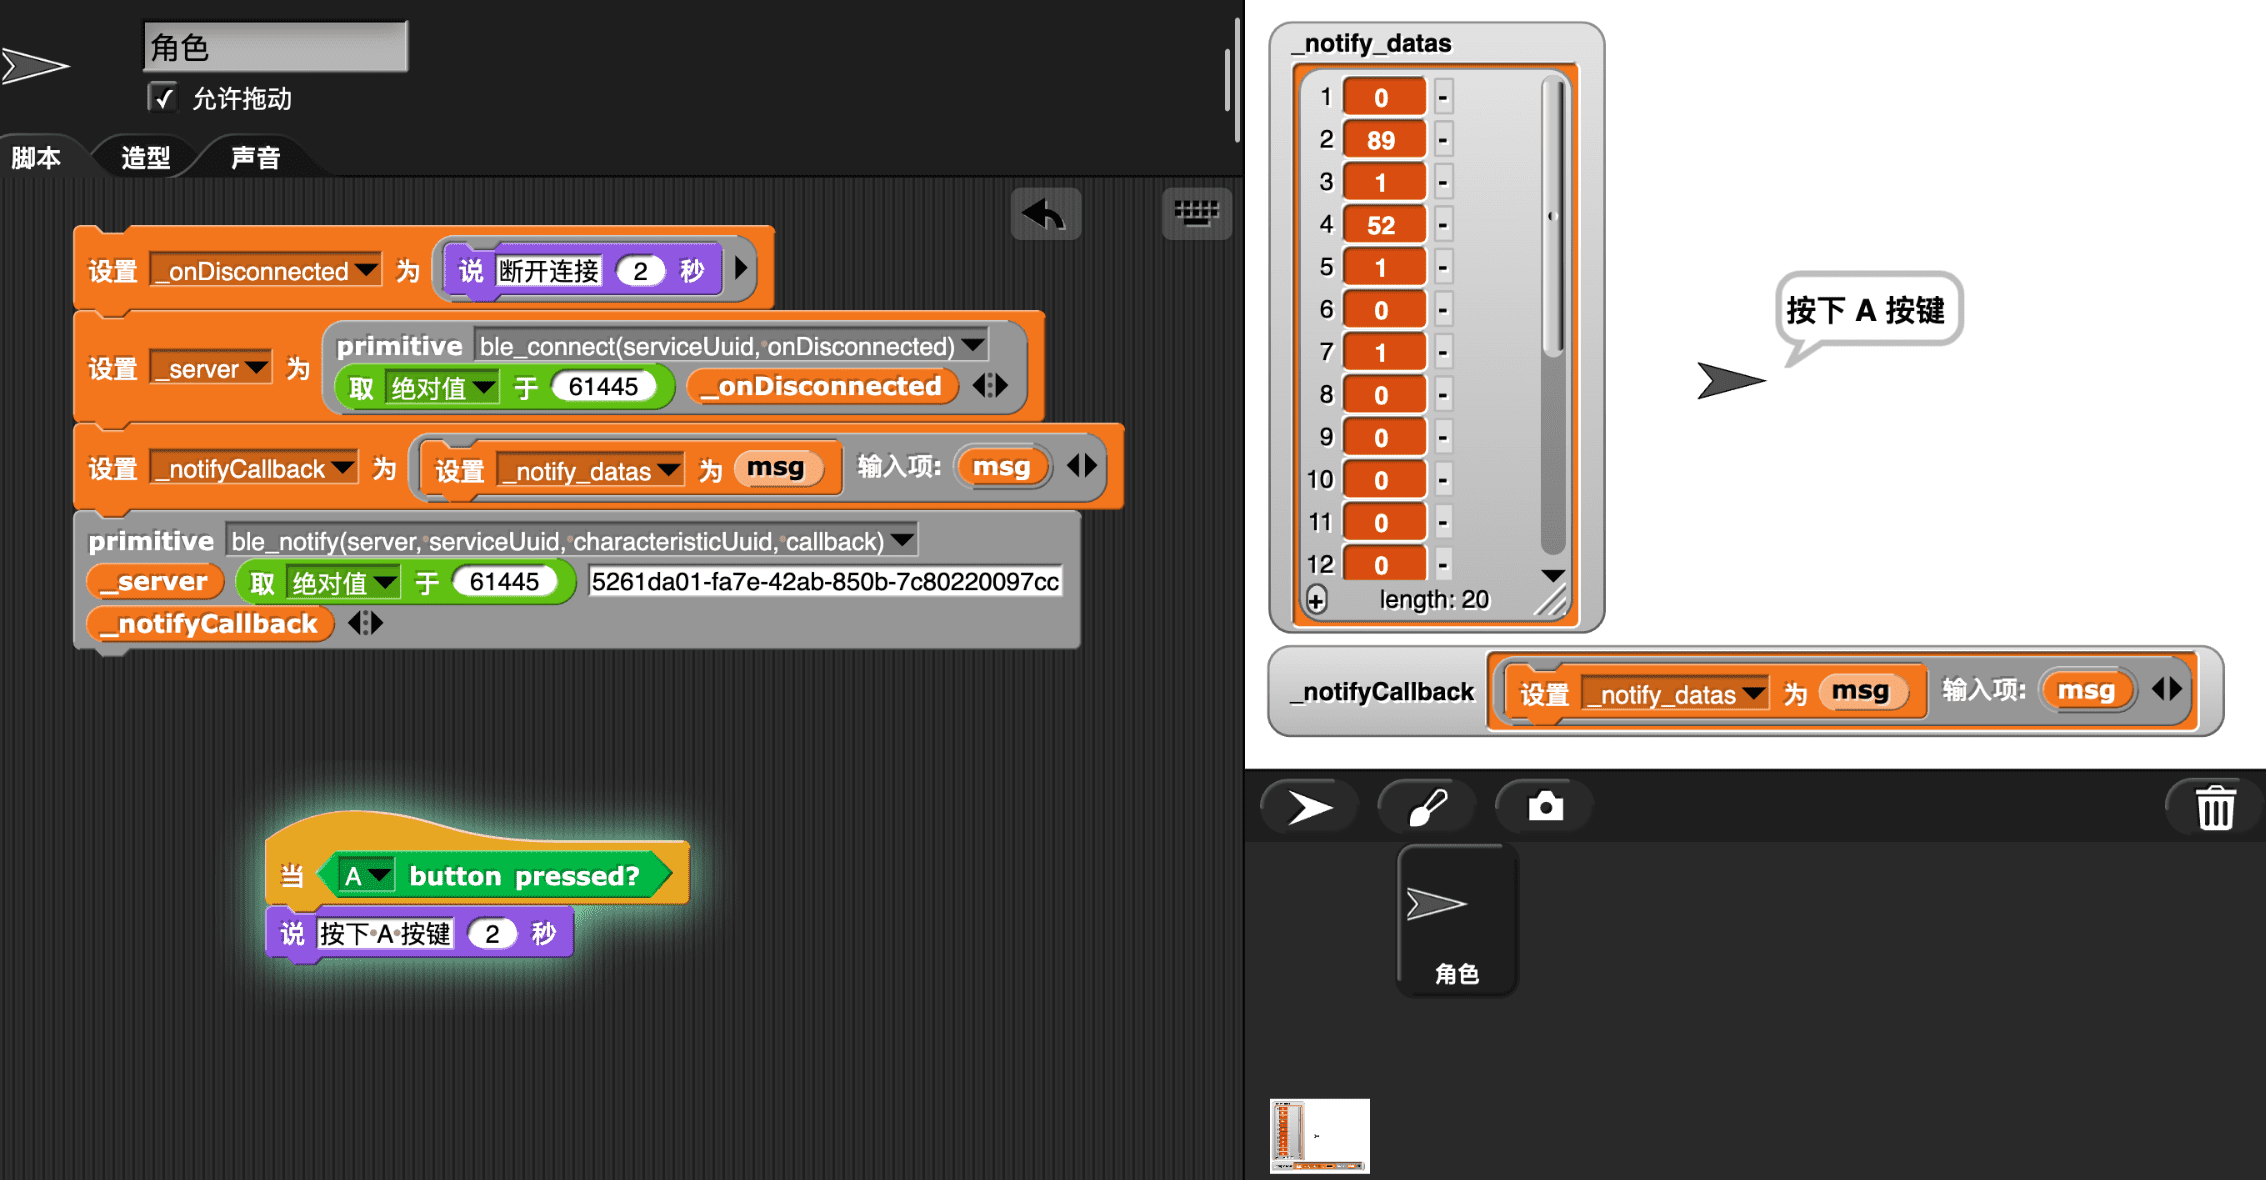
hat 积木
一旦完成 reporter 积木,也就完成了 hat 积木, 只需将其拉到通用的 when 积木里即可:
参考